The Google service, gmail, allows you to manage the PEC, Certified Electronic Mail, like a normal mailbox. There Certified mail is a service that allows private citizens and companies to communicate with the Public Administration or with each other to exchange messages with legal value, the electronic equivalent of a registered letter with return receipt. This service has existed since 30 June 2013 and all companies, both in corporate form and sole proprietorships, they are obliged to register their certified e-mail address in the Register of Companies.
Read on to find out how to configure PEC on Gmail.
If you manage multiple mailboxes with Gmail, you are already aware that Gmail works as a mail collector so you can avoid moving from one email service to another. Mail Fetcher, in Gmail, has the functionality of importing first the old messages of the Google service and then the new ones sent to the other account. It also allows you to add up to five accounts, including Gmail and other email providers. Among the boxes you can manage are the PECs.

How to use Gmail for PEC
The first step to take for configure PEC on Gmail is to retrieve the parameters of the PEC mailbox. Then open the Web mail service and connect using your username and password or search Google for something like “smtp pop pec Aruba” (Aruba is an example provider).
Now that you have the parameters, you can open gmail to start configuring the PEC message setup. Go to the Tools menu and click on "Settings".
In the Settings moved to "Account and Import".
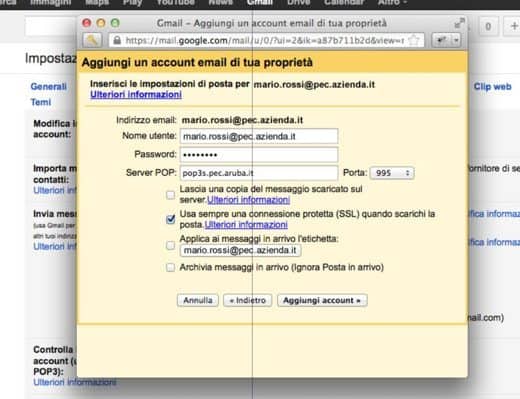
In the middle of the page you will find the section for managing accounts. Click on the command "Add your account in POP3 mail". A new window will automatically start with a wizard for setting up and importing the new account. You will need the PEC email address.
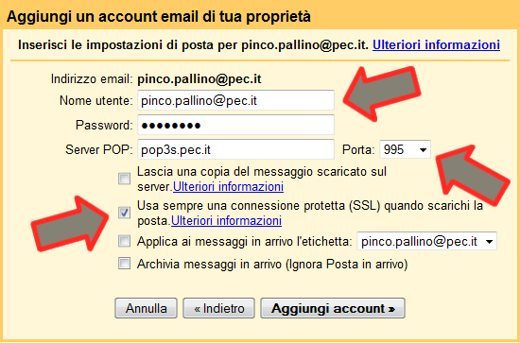
After clicking on "Successful Passaggio”You will see the screen where to enter the account management information: password and POP on all. For the door you will need to select 995 and not 110. This is because the server requires an encrypted connection (SSL). Alternatively you can set it as an incoming mail server IMAP making sure to indicate port 993 and the type of protection that will be SSL in this case as well.
Check your settings: you can label all emails with the words "PEC"While you need to activate the SSL protection item and"Leave a copy of the messages on the server”So that you have a saved copy.
After pressing "Add account“, Gmail will do all the necessary checks, and if all the parameters are correct it will start downloading the mail from the new PEC account.
At the end you can send emails with the new account.
Other useful articles
- PEC free
- Best free e-invoicing programs