How to add VAT number in Facebook advertiser account. Here is a quick and easy tutorial on how to set up billing information in Facebook advertising account.
If you are a company or entrepreneur registered for value added tax and are looking for a way to add your VAT number to your Facebook advertiser account to collect and remit VAT to the relevant Spanish tax authorities, you must follow these steps
How to add VAT number in Facebook advertiser account

- Open and log in to Facebook with your credentials.
- Click on Settings, at the top right (icon of the down arrow), and in the menu that appears, presses on Ads Management.
- Click on Settings, top right (icon of thegear).
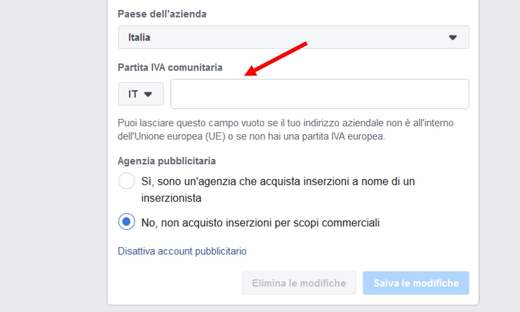
- On the page Advertising account setup scroll down until you find the section Community VAT number.
- Select in the abbreviation of the country, IT, and in the text box next to it enter yours VAT number.
- Also enter the Reason Social,company address, Company country, the advertising purposes and if you are an advertising agency or not.
If you have difficulty finding the route, click on this link and you will be redirected directly to the section of Setting up the Facebook advertising account.
At the end click on the button Save the changes and you will be able to enter the VAT number on Facebook.
Read also: How to promote your business on Facebook
How to view VAT charges on Facebook
To view the VAT charges you need to follow these steps:
- Open and Log in to Facebook
- Click on Settings and Privacy, at the top right (icon of the down arrow), and in the menu that appears, presses on Settings.
- Click on Payments for advertisements, in the left column.
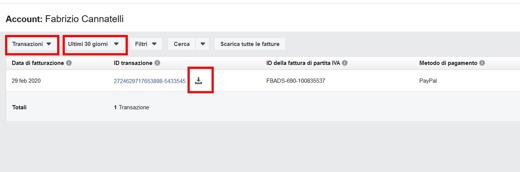
- In the window that appears, click on the button Show receipts.
- Above the list of yours transactions, click on the date drop-down menu and choose the date range for the receipt you want to download.
- Once you have found the transaction you want to receive a receipt for, place your cursor over the link Transaction ID and press on the download symbol that appears next to you.
- You can also download all the invoices by pressing the button Download all invoices.
After downloading the PDF file, you will notice that the amount you paid for VAT is shown next to the payment totals.
Even if no VAT charges have been made, the receipt will show a total for VAT.
For further information on the VAT number in your Facebook advertising account, I invite you to take a look at these pages:
- Information on value added tax (VAT)
- Will tax be charged to my Facebook Ads purchases?