After several years of using BlogEngine.net, I tried to configure it locally with Internet Information Server (IIS) also on Windows 10 and I must say that I had to perform several steps before being able to figure it out.
First I started it all by downloading from CodePlex BlogEngine.net 3.2 (Web). Consider that it is a .zip file, so you will have to unzip it in a folder, which I have decided to call be.
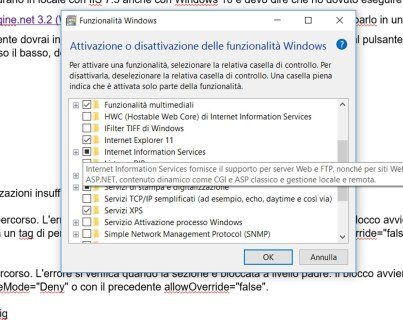
After this step open Windows 10 IIS. If it is not present you will have to install it by typing su Search Windows and the web (next to the Start button on the Desktop) the entry Turn Windows features on or off. Once found, click on it twice and in the window that opens, scrolling down, you need to locate the item Internet Information Server (IIS) and then check it out. Awards OK and wait for the installation.
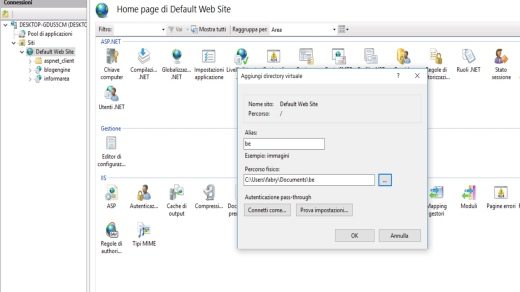
At the end open IIS and from Siti > Default Web Site, right click and in the menu that appears choose the item Add Virtual Directory. In the window that appears, in Alias type the name you want to give to your site in localhost and in the physical path press the button with the dots (...), to go and select the folder you created on the PC by unzipping BlogEngine.net 3.2 (in my case it is called be). Confirm by pressing the button OK.
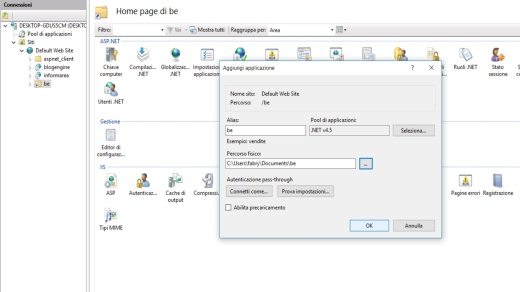
In the left window you will find the virtual folder be, click on it with the right button and select, in the pop-up menu, the item Convert to Application. In the window that appears in Alias digita soultricks, in Application Pool choose the item .NET v4.5 and finally, in Physical path enter the path of your directory (in my case it is called be).
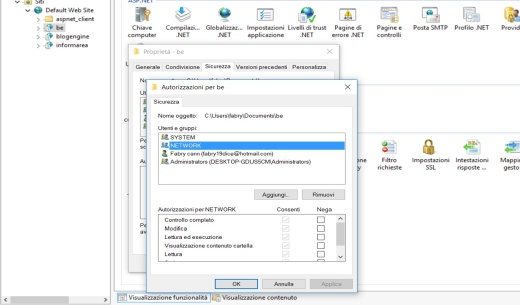
On the left you will find theapplication be. Right-click on it and select Edit Permissions. In the window that appears, choose the Security tab. Push the button Modification and subsequently Add. In Enter the object names to select, type PARTNERS e premium pulsating Check it out Nomi. As soon as PARTNERS you will be highlighted press on OK. Then assign him the Permissions putting a flag Allow to all items (Full Control, Write, Read, and so on) and press on OK.
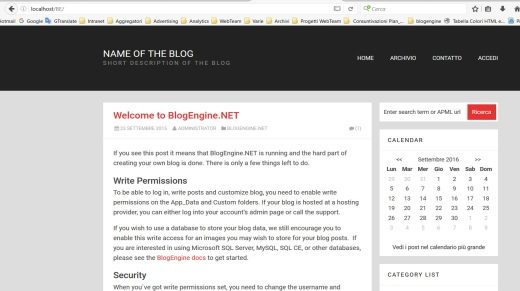
Now that you have completed the configuration of your application in BlogEngine.net you can try to launch it locally, then in localhost. Open a browser (Firefox, Chrome or Internet Explorer) and in the address bar type http: // localhost / be.
The first error you may get is this:
- Cannot read configuration file due to insufficient permissions
Reason? Windows 10 has a hidden administrator account, this means that you need to activate the hidden Windows 10 administrator account. To do this, follow the steps below:
In Search Windows and the web, type cmd;
- on the Command Prompt item, right-click the mouse and select the item “Run as administrator” in the menu;
- to activate the hidden account in Windows 10, type: net user administrator / active: yes and press Enter on your keyboard
- to disable it in the future, replace yes with no.
Perfect now you are administrator of your PC with Windows 10.
Try again to launch your http: // localhost / be application locally. You may run into this second error:
- Cannot use the configuration section in this path. The error occurs when the section is locked at the parent level. Blocking occurs by default (overrideModeDefault = ”Deny”) or is explicitly set by a path tag with overrideMode = ”Deny” or with the former allowOverride = ”false”.
In this case you will need to perform two steps:
Go up Search Windows and the web (next to the Start button on the Desktop) and type the entry Turn Windows features on or off. Once found, click on it twice and in the window that opens, scrolling down, you need to locate the item Net Framework 4.6 Advanced Service and then also check Asp.Net 4.6. Awards OK and wait for the installation.
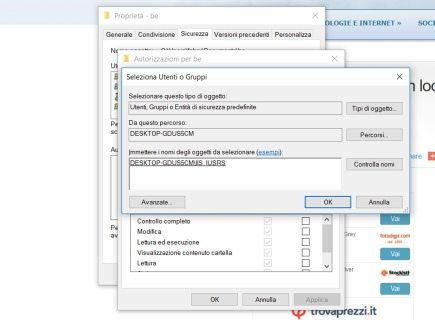
The second step is to enter the user as the default user IUSR giving it permissions with full control. To do this, you need to go up IIS and click with the right mouse button on the application that was created (in my case it is called be), and select Edit Permissions. In the window that appears, choose the tab Safety. Push the button Modification and subsequently Add. In Enter the object names to select, type IIS_IUSRS e premium pulsating Check it out Nomi. As soon as IIS_IUSRS you will be highlighted press on OK. Then assign him the Permissions putting a flag Allow to all items (Full Control, Write, Read, and so on) and press on OK.
Now try again from Browser to type in the address bar http://localhost/be and you will see your beautiful site appear in BlogEngine.net locally.
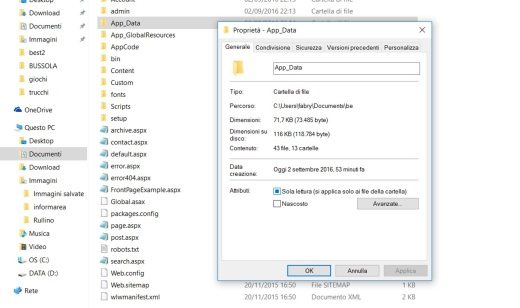
A I forgot, one last thing, to make BlogEngine.net work you will need to give write permissions to the App_Data folder. Then go to the folder be and locate the folder App_Data; with the right mouse button select Properties. In the window that appears remove the flag under Read only and confirm by pressing the button OK.
For further information take a look at the video below:
Alejandro Crespo Martinez
We are a specialized and passionate team of virtual reality. We have extensive experience in this area. We decided to create ForVirtualRealityLovers to share all our information with customers and users. We have quality information. You can find tips, guides, interviews, top products and much more! If you are curious, enter our site ForVirtualRealityLovers.com and discover the virtual world! 😉
How to Configure Windows Live Writer for Websites in BlogEngine.net ❯
Articles related to
Yahoo Answers will close on May 4, 2022: here are the alternatives
How to send large photos with Outlook
How to disable Javascript in Safari
How to change default browser on Android and iPhone
How to reset WordPress password
The new era of Apple with new MacsAdd a comment from How to setup BlogEngine.net locally with Windows 10Internet
❤️Chi Sleep For Virtual Reality Lovers?For Virtual Reality Lovers we are a team of people who aim to give you all the best information about Virtual Reality. What information do we share?We share everything you need to know about virtual reality, tips, prices, features, guides and much more !. 🤖What are the best virtual reality products?We have the best information section on the best virtual reality products. 
 This work is under a Creative Commons Attribution-Non-Commercial-No Derivatives 4.0 International License. 2021/primerpaso.me X Check out our best articles!
How to find out who visits your Facebook profile
How to insert a donation button in Blogengine.net
Track Twitter clicks with Feedburner
How to archive Outlook messages |