Last updated - 13/01/2021
Now known by many users, the emulator par excellence for those who intend to play Switch titles directly on their PC is Yuzu. In this regard, if you want to download and configure it in the best possible way, we recommend that you follow our dedicated guide: Yuzu installation and configuration.
Despite its notoriety and increasing compatibility with games, Yuzu has a "weak point": it does not allow you to play online multiplayer.
To fill this gap we think Ryujinx, another Nintendo Switch emulator that, in addition to running single player games, it also supports online features completely free of charge. Obviously, Ryujinx is in continuous development and still has some incompatibility problems that will be gradually solved, but it is a very valid alternative precisely because it allows you to play online as well.
In this guide we will help you to install and configure it so you can enjoy it to the fullest.
DISCLAIMER - Soultricks.com assumes no responsibility in case of non-compliant use of this guide. The emulators are fully legitimate only if the user physically owns the game from which he can obtain the files necessary for the emulation.
Before we begin, we consider it appropriate to do a couple of important premises:
- It is highly recommended to have a PC compatible controller in order to comfortably use all key combinations in games.
- This guide was written based on Windows 10, so settings names or some steps may differ for other supported operating systems.
1 - Download the latest drivers for your graphics card
First, make sure you have installed the latest updates available for your graphics card:
- NVIDIA: by clicking on this link or through the GeForce Experience application.
- AMD: by clicking on this link or through the Auto-Detect Tool application (downloadable from the same address).
2 - Download and install Ryujinx
To download Ryujinx, click on the following link: Download Ryujinx. At this point, select the version compatible with your operating system between Windows, macOS and Linux.
Unpack the compressed folder using WinRAR or a similar program, then open the one you just created and rename publish to Ryujinx Master.
Now you need to download LDN2, the second build of the software that allows you to enable Switch's online features on Ryujinx. Access the relevant Patreon page via this link, then click on one of the two files after the short article (depending on your operating system). In the case of Windows, you need to download win_x64.zip. Once the download is finished, unzip the compressed folder, open it and this time rename publish to Ryujinx LDN.
Go back to the Ryujinx Master folder, locate the OpenAL32.dll file, copy it and then paste it into the Ruyjinx LDN folder.
Once this is done, go back to the Master and run the Ryujinx executable, which will immediately return the following error message:
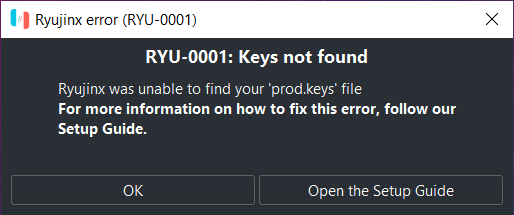
Click OK to enter the emulator home screen, then:
- At the top select File → Open Ryujinx Folder.
- Open system and drag in the required file. If you can't find it, refer to the last sentence of the guide for information.
- Restart the software: if you have done everything correctly, the warning message will no longer appear.
3 - Install the latest Switch firmware
Before moving on to configuring Ryujinx, you still need to install the updated Switch firmware. If you don't know how to get it back, refer to the last sentence of the guide for information.
Then on the Ryujinx home screen:
- Tools menu → Install Firmware → Install a firmware from a directory.
- Select the folder you just extracted and then Open.
- At the next prompt, click Yes. To verify the actual firmware installation, check the version at the bottom right on Ryujinx next to System Version.
- Close and restart the software.
4 - Ryujinx configuration
At this point you are ready to configure the emulator. On the Ryujinx home screen, enter the Options → Settings menu and change the various settings as follows:
"Input" tab
- First connect a PC compatible controller, preferably the XBOX 360 or XBOX One.
- Check Enable Docked Mode, then under Player 1 select Configure.
- In the menus above:
- Input Device → Controller / 0 (XInput Controller)
- Controller Type → Pro Controller
- Profile → Default, then click Load
- At this point, set the buttons on your controller based on the respective joycon buttons on the Switch, creating the appropriate mapping.
If you want to add more controllers for local multiplayer, repeat the procedure for Player 2, Player 3 and so on.
"System" tab
- System Region → Europe.
- System Language → Spanish.
- System TimeZone → UTC + 2: 00 Europe / Rome (delete UTC to open the complete list).
- Under Hacks enable Ignore Missing Services.
It is important to change the first three options correctly, as some games like Animal Crossing: New Horizons are closely related to them.
"Graphics" tab
- Check Enable Shader Cache.
- Resolution Scale → Native (720p / 1080p) if you have an HD or Full HD screen. If you have a 2K or 4K monitor, select the 2x option.
After modifying all these settings, click on Apply and then on Save to confirm everything.
5 - Loading the games
First, the game files are recognizable by the extensions .xci e .nsp:
- L'estensione .xci it is the exact copy of the original game cartridge extracted directly from the installation on the internal memory or SD card.
- L'estensione .nsp turns out to be the best as they are games downloaded directly from the eShop.
Basically, however, there is no difference in performance or operation.
For obvious reasons, we will not give you any indication on how to obtain these files, reminding you that the operation is only legal by purchasing the original version of the game.
To load them, go to the Options → Settings → General menu. Under Game Directories, click on Add and select the folder where all the Switch games you intend to load on the emulator are located. Confirm with Apply to bring up the list of titles.
Please note: at the very first start of a game it may take several minutes for everything to load. Wait until the console in the second Ryujinx window finishes working and the game starts.
Important for Animal Crossing: New Horizons - if you want to play this game, you must first proceed as follows to avoid a bug that generates continuous crashes.
- Right click on the game → Open Device Save Directory.
- Download the file at this link, drag it to the folder above and unzip it directly in there.
- Now you can start Animal Crossing: New Horizons.
6 - Installing game updates and DLCs
To install the Update games, proceed as follows:
- Right click on the title concerned → Manage Title Updates.
- Click on Add, select the update file with .nsp extension (always recommended), then Add → Save.
In the row of the game, in the Version column, you can check if the update has been correctly installed. Always remember to install the latest one so you don't have any problems, especially with regards to online games.
To install the DLC the procedure is the same:
- Right click on the title concerned → Manage DLC.
- Click Add, select the DLC file, then Add → Save.
7 - Multiplayer configuration
The last step to close this guide is the configuration of the online multiplayer, the peculiarity of Ryujinx. First of all, to take advantage of the online features you must always use Ryujinx LDN.
Type File Explorer on Start and press Enter. At this point:
- Left menu This PC → Local disk (C :) → Users → Your name.
- At the top, click on View and check Hidden items, then go to the AppData folder.
- Roaming → Ryujinx → copy the Config.json file and paste it into the Ryujinx LDN folder.
Now start the emulator executable from this last folder; once in the main screen:
- Options → Settings → Multiplayer.
- Uncheck Disable P2P Network Hosting.
- Write the username you want.
- Check Enable LAN Connectivity, which will allow you to play online with Switch owners. To do this, simply create a lobby or join other players.
Congratulations, Ryujinx is now perfectly configured for both single player and multiplayer titles. For any request or doubt, you can contact us via our Facebook page or directly enter our official Telegram channel by tagging @ Ping1995 for information on the guide.


