Without writing a line of code and thanks to the Google tool we can create Android applications directly online and in no time.
Developers who choose Android, the BigG mobile operating system, have at their disposal a programming language, a library of powerful and complete features, an open and flexible development environment. There is no shortage of documentation and technical articles, as are the online communities where Android developers gather and help each other. Programming Android applications is fun and easy.
How to create an Android application
To meet the needs of those less experienced in programming, however, Google is gradually introducing Inventor App, an alternative way to build Android applications without writing a single line of code. App Inventor is nothing more than an online web application that can be used on systems such as:
- Windows XP, Vista, 7
- Mac OS X 10.5, 10.6
- GNU/Linux Ubuntu 8+, Debian 5+
The compatible browsers are:
- Mozilla Firefox 3.6 or later
- Apple Safari 5.0 or later
- Google Chrome 4.0 or later
- Microsoft Internet Explorer 7 or later.
Both system and browser must have Java 6 installed.
With App Inventor applications can be literally drawn on the screen of your computer quickly managing to create, verify and sell real competitive Android applications.
Although App Inventor does not need to be installed, being an online application, it is still necessary to install an additional package called App Inventor Setup Software which contains additional tools for the verification and packaging of applications and has the utility of verifying the applications created on a real device connected via USB to the computer or alternatively on an emulator.
The links to download the package, depending on the operating system, are:
- Setup Windows
- Setup Linux
- Setup Mac
We download and install the package according to the instructions on the page. To verify that the installation was successful, go to the directory where the software was installed and run the command run-emulator.
This command starts the emulator of the Android system included in the package, take note of the installation path of the newly configured software could be useful later.
Now to access the online application, you need to have an account and ask to be enabled to use the service. Let's connect to the address appinventor.googlelabs.com. If we already have a Google account we can log in otherwise we follow the steps to sign up.
How does App Inventor work?
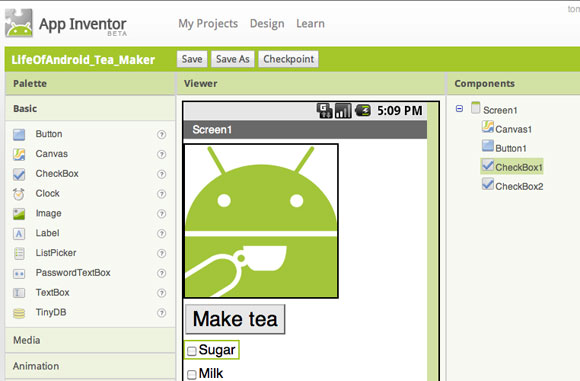
The App Inventor platform is organized by project, each application we want to create is part of a project. For this as soon as you log in the first thing that appears is a list of projects we are working on. As soon as you are registered you will need to create one by pressing the button New. We will be asked to assign a name to the project, after assigning it we confirm and save.
The new project will be created automatically and the screen presented at this point by App Inventor is the main workbench of the platform, in which it is possible to build the application. In the center of the screen there is a preview of what the software being worked on looks like. On the left there is instead, the palette of components. A component is a building block that you can use to build your application. An example of a component is the button, the image and so on.
Applications are built by combining a number of components together. The component palette is divided into different categories: the basic components (buttons, images, etc.) and the advanced components (sound, video players, etc.).
Design of an application
Let's try to create an application that once launched shows the image of a car and under this image there will be a button with the message start, when the user presses the button the phone will have to play the sound of a roar of a motor.
With App Inventor we are able to do all of this. All we need is a jpg image of a car and an MP3 file with the roar of the engine. We build the graphical interface and from the Palette, in the group Basic we select the component Image and drag with the mouse inside the application. We also drag the component Button placing it just below the image.
In the Components Palette we identify the component Sound. We also drag this into the application. After populating the application of the above components let's take a look on the right. There are three very important areas:
- Components: in this area there are all the components used in the application.
- Properties: contains all the useful tools to modify the properties of each element of the application.
- Media: all the multimedia files necessary for the application are listed here. With the Add button it is possible to start the upload procedure of a new file.
Let's use the area first Media to load the image and audio mentioned above. Let's go, then, on Components and select Screen1, which corresponds to the main screen of the application and modify some of its characteristics in the area Properties. Let's change the background color to black and change the title of the window to Automobile. Now let's move on to Image1 and bind to the property Picture the car image loaded just before in the section Media. We also modify the properties of the Button1 component. In particular, let's change the text inside it by setting the property Text on the value "Put in motion". We end up also modifying Sound1 by associating the previously downloaded MP3 to it.
Blocks Editor
The application interface is ready. We just have to make sure that when the user presses the button the roar of the engine is reproduced. To do this we need to Blocks Editor, a visual editor that completely replaces the need to write code and does so through graphical representations of cause-and-effect flows. At the top right, the App Inventor presents the button Open the Blocks Editor. Let's click on it. The Blocks Editor software will be downloaded and run immediately. At the first run, the Blocks Editor will ask you to type the path of the command adb, which is one of the utilities previously installed with the App Inventor Setup Software package, and which is used to connect to the emulator or to a real device. We go to our disk and look for the path of the command adb.exe (windows) or adb (Linux and Mac). We provide this path in a comprehensive way, for example C:program filesAppInventorcommands-for-appinventoradb.exe (Windows).
Link events
Once the Blocks Editor has been started, we can see all the components that we have inserted in the application inside it: they are in the tab corresponding to the tab My Blocks.Touch the voice1 button: the list of blocks corresponding to the events and properties of the component will appear. Green Blocks are of the type “When… do” eg “When Button1.Click do”, which means “When Button1 is clicked do this”. In fact, inside them there is space to insert an action type block such as those of the “call…” and “set… to” type. THE call blocks they perform an action that the component can perform, for example “call Sound1.Play” plays the sound contained in the Sound1 component. The Blocks Setinstead, they change the value of a component property, for example “set Image1.Picture to” changes the image shown by the Picture1 component. The set blocks must be linked to another block category, which supplies the new value to be set. This value can be read from the properties of another component, or specified in another way through one of the other characteristics made available by Blocks Editors.
Now let's make sure that when you press Button1 the sound of the Sound1 component is reproduced. Let's drag the block "when Button1.Click do”In the work area. Let's connect it with the block "call Sound1.Play".
Advanced Sequences
Let's try adding a second consequence to pressing the button. Let's say that after starting the playback of Sound1 the text of Button1 changes from "Start" to "Vrooooam!". Just add the block "set Button1.Text to” all’evento “Button1.Click". The new text can be specified using one of the blocks of the Built-in group. We drag the text block into the area and hook it to "set Button1.Text to". At this point, by clicking on the new block, we can type the text to be set.
Test dell’APP
To test the application we can use the emulator or a real device. For the real device it is necessary to connect it to the computer via USB, not before having installed any drivers supplied by the manufacturer. To use the emulator, instead, just run the command run-emulatorand wait for the emulated system to load. From inside the Blocks Editor, at the top, we press the button Connect to phone. Let's wait a few moments: the device will be contacted by the App Inventor and the application will be downloaded into it.
Blackboard project
Let's make a second slightly more complicated project. We take advantage of the touchscreen of our Android device, creating an application that works a bit like a blackboard. The user with his finger can draw lines and marks on the screen. In addition, he will be able to determine the color of the virtual plaster: white, yellow or red. To complete the work we also provide a button that functions as an eraser, cleaning the surface of the blackboard.
- Let's go back to the list of App Inventor (My Projects) from which we create a new project that we will call "Blackboard". Let's build an interface like this:
- We customize Screen1, changing the window title to "Whiteboard" and change the background color to black.
- Let's drag a component from the palette HorizontalArrangement, which is part of the list Screen Arrangement. This component allows you to arrange a series of other components in sequence.
- Inside the element HorizontalArrangement we insert a series of four components Button.
We customize the buttons, changing the names from Button1, Button2, Button3 and Button4 to ButtonWhite, ButtonYellow, ButtonRosso and ButtonClean. Let's change the text of the buttons to be "White", "Yellow", "Red" and "Clean". We also change the appearance of the buttons: we put the background color of all four buttons on black, increase the size of the text to a value of 20, set the use of bold and change the color of the text. Finally, let's put in italics the words “Clean” on the fourth button.
Let's drag a type component from the palette Canvas, which allow you to draw lines freely on the screen, placing it immediately below the element HorizontalArrangement arranged above. We manipulate the properties of the Canvas object by putting the background on the black color and the drawing color (PaintColor) let's set it to white. Then we adjust the dimensions of the element: for the width we choose the value fill_parent and for the height we type the precise value of 370 pixels.
Check that the component name is Canvas1 and once the interface is completed, let's move to Blocks Editor to program the logic necessary for the application. Here are the steps to follow:
- By clicking on the White button we have to change the PaintColor of Canvas1 by setting it to white.
- On clicking the Yellow button we have to change the PaintColor of Canvas1 by setting it to yellow.
- By clicking on the Red button we have to change the PaintColor of Canvas1 by setting it to red.
- On clicking the Clean button we have to clean up the contents of Canvas1.
- Somehow when the user drags his finger inside Canvas1 we have to draw a line of the set color.
Let's see how to accomplish these five points:
We drag the event handler onto the field "When ButtonBianco Click do", We fit the block inside it"set Canvas1.PaintColor to". The color to be connected to this block can be chosen from the Colors group of the block section Built-in. Naturally choose the color related to the name of the component (eg for ButtonWhite choose the color White). Instead, the Clean Button component must be associated with a different action, the block to be inserted is among those of Canvas1 and to be exact the action "call Canvas1.Clear". Now you have to make sure that by dragging your finger on Canvas1 some lines are drawn. The event to be managed is "when Canvas1.Dragged do“, Let's drag it onto the Blocks Editor workspace. This last block is slightly more complex than the others, because it is not enough to know that the finger has moved, it is also necessary to know where it started from and how far it arrived, in fact this type of blocks automatically hook the blocks of type "name…". When the user drags their finger, the event will report additional information within the linked variables. We are interested in knowing that prevX e prevY they will report the coordinates that your finger had before the event, lie currentX e currentY they will report those reached at the end of the movement. Using this information, we can insert the consequence of the event by dragging a “call Canvas1.DrawLine” block inside it. To draw a line you need the four coordinates that indicate where the line starts from (x1 and y1) and where the line ends (x2 and y2) and, in fact, the block we have added has the necessary hooks for these four information.
The blocks useful for carrying out the connection operation between these pieces and the variable are present in the My Definitions item. Drag the blocks "value prevX","value prevY","value currentX","value currentY”Hooking them respectively to the pieces x1, y1, x2, y2.
Through the examples shown we have seen the potential of App Inventor, although we can learn more about this fantastic tool by following some of the many tutorials available in the section Learn (chewing some English of course).

The final step in deploying Android applications is a file with .apk extension. With this type of file it is possible to distribute the application on the market. We open the corresponding project on App Inventor and from the main work screen we open the list Package for Phone and we choose the voice Download to this Computer.
We will then be able to download the .apk file that contains our finished application. If we want to distribute our App through the Google Android Market, we connect to the following link Publishing su Google Play. To publish, however, you have to register and pay 25 dollars (about € 19) by credit card.
Until next time.