Emulators, as you well know, let you play titles from another platform directly on your PC. Unlike what you might think, it is fair to clarify that this is perfectly legal software, of course, as long as you don't download pirated games.
The latest technical prodigy that has gained the interest of many users has been CEMU, which owes its success not only to the possibility of emulating the entire Wii U title park, but, above all, to the excellent optimization and improvement work done with The Legend of Zelda.
Now, however, it's time to get familiar with Yuzu, an emulator capable of running the latest Nintendo Switch games on your computer. In this guide we will help you install and configure it in the best way to get the best performance from all titles.
DISCLAIMER, Soultricks.com assumes no responsibility in case of non-compliant use of this guide. The emulators are completely legitimate only if the user physically owns the game from which he can obtain the necessary files for the emulation.
Before proceeding to the different phases, we inform you about the minimum and recommended requirements to use the program:
Minimum requirements (2D games)
- OS: Windows 7 64-bit or better / 64-bit Linux
- CPU: Intel Core i3-6100 / AMD Ryzen 3 1200
- GPU: Intel HD Graphics 520 / NVIDIA GeForce GT 1030 / AMD Radeon R7 240
- RAM: 8 GB
Recommended requirements (3D games)
- OS: Windows 7 64-bit or better / 64-bit Linux
- CPU: Intel Core i5-8600K / AMD Ryzen 5 3600
- Graphics card: NVIDIA GeForce GTX 1060 6GB / AMD Radeon RX 470 8GB
- RAM: 16GB
Important Premises:
- It is highly recommended to have a PC compatible driver to comfortably use all key combinations in games.
- The guide was written based on Windows 10, so the names of the settings or some steps may differ for other operating systems.
- If you have installed Yuzu before and, when you start it, the automatic update bar does not appear, it means that your version is outdated. In this case, type %appdata% in the Windows search bar and completely delete the yuzu folder. Then, re-download the emulator by following the steps below.
1 - Download the latest drivers for your graphics card
First, make sure you have installed the latest updates available for your graphics card:
NVIDIA: via the GeForce Experience application.
AMD: via the Auto-Detect Tool application (downloadable from the same address).
2 - Download and install Yuzu
To access the official Yuzu website, click on the following link: Download Yuzu. First, download the latest version of Microsoft Visual C++, as reported on the same page, and install it.
Once done, download the Yuzu installer, run it and continue with the installation without changing the default check marks.
Start the application: after a brief update(new updates will always be performed automatically), when you open it you will be shown a message warning you of some missing files for the correct functioning of the program:
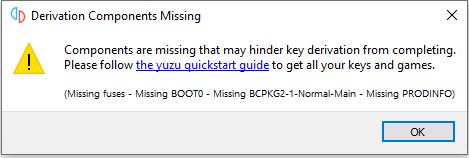
If you do not know how to retrieve these files, refer to the last part of the guide for information.
- In the Yuzu home screen, at the top click File → Open Yuzu folder.
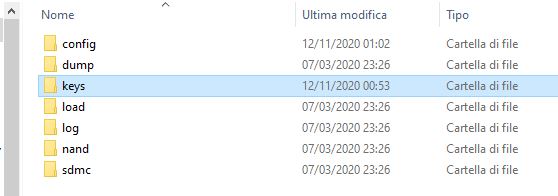
- Create a new folder named keys:
- Drag the required file to the newly created folder.
- Close and start Yuzu: if everything went well, the warning message will no longer appear.
3 - Configuring Yuzu
At this point, we can continue with the configuration of the various emulator settings.
On the Yuzu home screen, enter the Emulation → Configure ... menu, then:
General tab.
- Under General, check the Multicore CPU Emulation option.
- In User Interface, select Row 2 Text → None to make the Yuzu interface much cleaner.
"System" tab.
- If you share Yuzu with some friends but want to have separate saved games, you can create different profiles. To do this, click Profiles → Add and enter the desired names. To switch between different users, simply select them.
- Under Services, in the BCAT Backend entry, select None.
CPU tab
- Select Precise from the drop-down menu.
Tab "Graphics".
- First check the Asynchronous GPU Emulation option.
If you have an AMD Graphics Card:
- Under API, select Vulkan.
- Under Advanced, check Use asynchronous shader build.
If you have an NVIDIA Graphics Card:
- Under API, select OpenGL.
- Under Advanced, check Use assembly shaders.
Audio Card
- Set the default volume for games according to your preferences (we recommend you to reduce it enough and manage everything through the volume control of the speakers / headphones).
Controls" tab
- First connect a controller, preferably the XBOX 360 or XBOX One controller.
- Under Connect Controller, select Pro Controller.
- Then, under Input Device, select XInput Controller 0.
- At the bottom, under Console Mode, select the Docked Mode option.
- At this point, configure the buttons on your controller based on the respective joycon buttons on the Switch, creating the appropriate mapping.
To configure the analog sticks, simply click on the relevant controls and move the sticks in their respective directions. By doing so, you should now position the directional sticks correctly. About deadzone, set them both to 10%, leaving the Modifier entry blank (it should appear [unused]).
Note: the only game for which you have to check the Joycons Docked option is Pokémon Let's Go. In this case, make sure the Controller Type is None on Player 1, then proceed with the mapping as described above.
Once you have done everything, click OK to save the changes made.
4 - Optimizing system performance
To get the best performance in games emulated with Yuzu, you must also make some changes directly in Windows.
- Click Start → Settings → System → Power and Sleep.
- Go to Additional power settings and make sure you have selected High performance.
- Go back to Settings → System → System Information and enter the System Information item.
- On the left, click Advanced System Settings → Advanced tab → click Settings in the Performance section.
- Advanced → Change... tab in the Virtual Memory section.
- Uncheck the top, then select your fastest HDD / SSD (where you should have installed Yuzu). Now manually set the initial and maximum size values to 20000 if you have 8GB of RAM; if you have at least 16 RAM instead, increase both by 25000.
- Click OK to confirm your changes and then click Apply.
- Restart your PC for everything to take effect.
Now go back to the Yuzu startup screen, then:
- Click File → Open Yuzu folder and close the emulator.
- From the path reached, at the top select AppData → Local → yuzu.
- Right-click maintenancetool.exe → Properties and check the option to start as administrator, then confirm.
- Now enter the folder ending with msvc, right click on yuzu.exe → Properties and check the above option here as well.
- Repeat the above for the folder ending with early access, if it exists.
Maximum performance on NVIDIA GPUs
If you have an NVIDIA graphics card and want to get the best performance possible, follow these tips.
- Right-click on the desktop → NVIDIA Control Panel.
- 3D Settings → Adjust image settings → check Use advanced 3D image settings → Open page.
- Program Settings → Add tab → select Yuzu and add it.
- In the parameter list, change the following:
- Vertical synchronization - Disabled.
- Thread optimization - On
- Triple buffer - On
- Power management mode - Prefer maximum performance
- GPU OpenGL rendering - select your GPU
- Click Apply.
5 - Load the games in Yuzu
We have reached the last part of the guide, or how to mount the titles in Yuzu and finally start playing. The game files are recognizable by their extensions. .xci and.nsp:
- The .xci extension is the exact copy of the original game cartridge extracted directly from the installation on the internal memory or SD card.
- The .nsp extension happens to be the best as they are games downloaded directly from the eShop.
Basically, there is no difference in performance or operation, but the second file type is always preferable.
For obvious reasons, we will not give you any indication on how to obtain these files, reminding you that the operation is only legal by purchasing the original version of the game.
Important: Not all Switch titles are 100% compatible with the emulator, which can create startup problems, delayed audio and other inconveniences that undermine the gaming experience. To check that the games are fully functional, click on the link below: Yuzu - Game Compatibility List.
To load games, start Yuzu and on the home screen:
- Double-click to find the folder in which to find the individual game files.
- Select it and it will automatically load all the titles contained.
Note: the folder must contain only .xci or .nsp files; if there are other subfolders, the application will not be able to retrieve them.
- To start a game, simply double-click on it.
- To exit a game, click Emulation at the top and then click Stop.
6 - Install game updates
If you have an update in .nca format:
- Click File → Install files in NAND.....
- Select the .nca update.
- From the drop-down menu, select the game update option. If an error is displayed, verify the encryption keys and download.
If you have the .nsp version update (recommended):
- Click File → Install files on NAND.....
- Select the .nsp update.
- The program will inform you that it will proceed with the installation, so accept.
If you have updates installed on the NAND or SD card:
- Copy the entire NAND to% appdata% / yuzu / nand / nand / user or the entire SD card to% appdata% / yuzu / sdmc.
7 - Install the DLC
The DLC installation is identical to that of the updates, so follow the procedure described above.
If the update or DLC has been installed successfully, a message will appear next to all the games in the Add-ons column of the game list with the word Update or DLC.
If you have only installed an .nca update, it will probably just say Update. If, on the other hand, you have copied the entire NAND or SD or used an .nsp update, it will also show the version of the update and DLC. Don't be alarmed if the numbers don't match the installed version. The version in the game list is the one determined by Nintendo's servers, while the in-game version is independent.
Congratulations, Yuzu is now perfectly configured to run as many Switch titles as you want. For any request or doubt, you can contact us through our Facebook page or directly enter our official Telegram channel.