A few days ago we described you how to make an iPhone App, now let's see the correct procedure to publish it onApp Store.
Here are the steps to follow:
- Purchase an annual developer license;
- check that the application reflects the rules dictated in the document called iPhone / iPad Human Interface Guidelines;
- verify that the application does not use non-public APIs and unofficial frameworks;
- creation of a system of keys necessary to sign your application on the Provisioning Portal;
- creation of the publication profile Xcode (development environment to create Apple App);
- creating a file Entitlements;
- modification of the project compilation options;
- compilation and packaging;
- publication on iTunes Connect;
Purchase of the License
After testing your application with the tool Apple SDK, for the publication phase it is necessary to purchase an annual license costing € 79. There are various types of licenses, but the two most used are:
- the Standard Program;
- l’Enterprise Program.
The latter costs $ 200 more and is aimed at companies with more than 500 employees and inhibits the possibility of publishing on the Apple Store, favoring, instead, the internal distribution to its employees. The Standard Program, on the other hand, can be used by individual developers, but also by companies that intend to publish on the Apple Store.
These programs also allow you to test your software, for a more accurate test, on physical devices, iPhone, iPad, iPod.
Another feature is the so-called AdHoc Distribution, the procedure that allows you to send your software to other devices for testing and advertising purposes. This type of distribution loses its validity only after a few months as it is a temporary distribution system and was created to allow sending to test users who are not part of the developer team.
Other benefits of these programs are: the ability to purchase prerelease versions, access to the Apple Developer Forum, and a two-year Apple technical warranty.

Register as a Developer
To register as a developer, go to http; // developer.apple.com/programs/iphone and click on the Enroll Now button. At this point, a series of mandatory steps are initiated, which provide enough information for Apple to register. So let's create an Apple account and choose Standard Program. After all the steps have been completed, Apple may try to contact you to verify that we entered the information correctly.
For companies, on the other hand, Apple requires by fax a legal document that certifies the actual existence of the same and above all the registration with the Chamber of Commerce. After a few days we will receive a series of confirmation emails that will allow us to finalize the registration.
At the end we will have access to several portals to publish the software; iPhone Provisioning Portal and iTunes Connect in the first place. The first acts as a portal, and you need to access it to create the certificates that are used to test on physical devices, and to submit your applications to the Apple Store. iTunes Connect is the service that accepts programs made for iPhone, iPad, iPod. It represents the last step necessary for publication.
Check with the Human Interface Guidelines
Before sending everything to Apple, you need to check your software to make sure it complies with the rules listed in the document called Human Interface guidelines (HIG). The document available both online, in HTML and PDF format, and in the documentation attached to XCode, dictates the rules on what Apple evaluators deem admissible in an iPhone application and what forces them to reject it.
The information contained within it must be followed to the letter by each developer to ensure that your application is consistent with all the others already present on the App Store. There are many errors that can be made:
- software crash;
- unintuitive visual components;
- misleading icons;
- lack of UIAlertView, which is important for keeping the user informed when connection failures occur;
- different icons are used between the App Store and the software's internal one;
- it supports interface rotation without rearranging the layout.
Non-Public Methods or Functions
The rejection of a software may not only depend on the HIG but also on the Apple team after having ascertained the use of functions, methods and classes not available in the SDK. The rule of not using private APIs is present in the iPhone developer program license agreement, a document that must be accepted when you become an iPhone developer and buy the license to publish. Furthermore, the XCode compiler warns the developer through a warning if illegal operations are performed.
Unofficial Technologies
The languages that Apple has decided to use are C, C ++, Objective-C or Javascript. This limitation does not prevent, however, from using libraries available on the Net made in the aforementioned languages, provided of course that they do not access undocumented Api. Using languages other than those required by Apple could lead to disapproval, so our advice is to avoid alternative ways and study Objective-C thoroughly.
Validate Build Project
To reduce any waste, a new feature called Validate Build Product has been introduced within XCode 3.2, which can be activated via a checkbox available in the Build configuration of the project. Selecting this field requires that many checks are carried out that Apple evaluators carry out when they receive an application. This naturally serves to minimize any software problems.
The Request for the Keys
Before sending your software to Apple, you must digitally sign it. There are three steps to follow:
- creation of the Certificate of Distribution;
- creation of a generic or specific App ID;
- creation of a Distribution Provisioning Profile for the App Store.
Regarding the creation of the Certificate of Distribution. Apple requires that you submit a file identified in the documentation as Certificate Signing Request. To create this document it is sufficient to perform a few steps inside the application called Keychain Access installed in the subfolder Utility of Applications.
After starting the application, we make a request for a certificate to a CA (Certification Authority). In the text field dedicated to the email you must enter the one used during the registration phase as an iPhone developer. The field CA Email Address must be left blank. You will then have to select the radio button, save to disk and the checkbox Let me specify key pair information to do it on your computer, in order to send it later through the Provisioning Portal. The key size must be 2048 bits. the algorithm, Rsa.
We access theiPhone Dev Center then follow the link on the right side, called iPhone Provisioning Portal. The guide called iPhone Developer Program User Guide, is the best source to clarify any doubts and can be downloaded from the link on the right of the Home Page of the Provisioning Portal.
Provisioning Portal
We enter the section called Certificates, we select the tab positioned at the top of the page, called Distribution, and click on Add Certificate. We send the file we created, using the form. After a period of time, during which the status of the certificate is "pending", we will find within the page the certificate with the status of "issued" associated with an expiration date.
We click on the button download for free. The certificate will be installed automatically within Keychain Access, or you will have to double-click on the file. It is important to save one backup copy of this file. Now we need to create a general App ID, identified with the asterisk symbol: in the section App IDs we select the button at the top of the page called New App ID. We are now on a page with three fields. In the first we will insert the description of the certificate. Let's set the field Bundle Seed ID to the value Generate New. The last camp Bundle Identifier must contain the character *.
At the end of the creation we will find in the list our App ID identified by a sequence of six characters followed by a period and an asterisk (xxxxxxxxxx.*). The reason string is automatically generated.
Let's enter the section Provisioning, we select the tab at the top called Distribution and click on New Profile. We select App Store as a distribution method, we associate a name to this profile and select the one created as the App ID, using the asterisk. We confirm and reload the page until it is in the Active state. Download the newly created profile and install it on the PC.
Both the certificate and the distribution profile have an expiration term, after which it must be renewed (renewal occurs by pressing the renew button). After the renewal, simply install the certificates again on your computer.
The Certificates required for Testing
To install the development version of your software on any iPhone, iPad, iPod Touch you need:
create a certificate for development (tab Development instead of Distribution), following the same steps already described;
register one or more devices by entering the code UDID;
create a provisioning profile for development (tab Development instead of Distribution) following the same steps already described and taking care to select the certificate, the APP ID and the devices that will be used.
When creating Provisioning Certificates, it is advisable to insert a code in the name to indicate whether it is development or distribution. In the second case it is better to also insert a string if it is for Apple Store o per la AdHocDistribution. This way you won't have any doubts about which one to select within XCode.
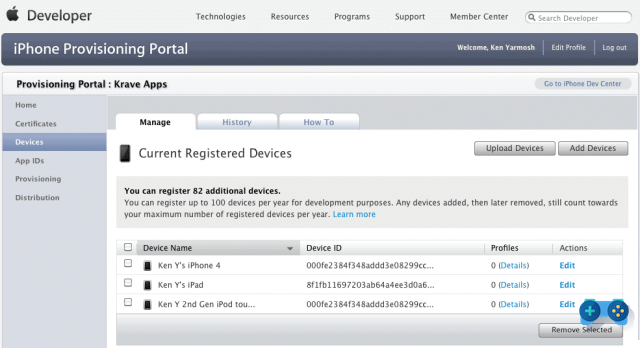
Device Registration
After creating and installing a new certificate for development, at least one unique identifier called UDID (Unique Device ID) must be entered, associated with the device that will be used in the section called Devices. To obtain this alphanumeric string it is sufficient to use the tool Organizer supplied with XCode (Window / Organizer), select the connected device in the list in the left column and copy the string associated with the item Identify. Through iTunes just select the connected device and after clicking on Identifier under the string Software Version press sequence CTRL + C. If, on the other hand, the item Identifier appears Serial Number, just click one or more times on this line to view the identifier. A third solution to obtain the UDID is to install one of the many free applications available on the App Store that allow you to send this code to an e-mail address.
We insert a new device: click on Add Devices, fill in the field with a name of our choice that identifies the hardware used (iPhone User Name, iPad User Name, etc.) and the second with the UDID just copied. After inserting one or more devices, it is necessary to create a new provisioning profile of the Development type and select the associated devices. It is possible to add or remove those authorized, but then replacing the old provisioning profile installed on your computer with the new updated version.
Only within the Provisioning Profile it is possible to know in detail which devices are enabled, because within the Organizer tool only a numeric value equal to those configured in the profile will be displayed. If we want it is possible to carry out the AdHoc distribution, which allows you to distribute our application in the final version to other users, without going through the Apple Store.
In practice, an application is signed with the same procedures necessary to send it to the Store, using a different provisioning profile. The software and the profile will be sent to the user, who can then test it:
- create a Distribution Provisioning Profile, selecting the AdHoc item, using the Distribution certificate as the certificate (the same to publish on the Apple Store) and enabling the devices on which it will be installed;
- sign our application with this certificate;
- send Provisioning Profile and application to the user via email or web link;
- install both files in iTunes by dragging them into the downloaded applications area;
- sync your device.
The limit of AdHoc Distribution is that it has a limited duration. It is therefore not an alternative but a test or a way to advertise. At the moment the duration is six months, after which it will be necessary to update the profile (“renew”) and send it back to the user to have it installed on the phone.
Now we have to go back to XCode to package our application and access the iTunes Connect section to send it to Apple.
L’Utility Organizer
After creating and installing the certificates, you can start XCode again. Organizer is a utility accessible from the menu Window of XCode and allows you to do many operations. As soon as a device is connected and having accepted the development authorization request, we can drag it into the field Privisioning the various profiles and immediately after dragging the application, obviously associated with these profiles during compilation, into XCode.
The Configuration for Publishing
Let's create a new file from the menu File/New File, we select item Code signing and, on the right, the voice Entitlements. The file name will be Entitlements.plist. If this has not been done previously, you need to create a Png file, which will be used as an application icon. We set the name of the icon file inside the file nomeprogetto.plist created by XCode and change the Bundel identifier by inserting before - $ {PRODUCT_NAME: rfc1034identi er} an identification string (example it.leganza). At this point it is necessary to create a configuration within the project properties, which we will call Production. We enter the properties of the project, in the tab Configurations and select that call Release and click on the button Duplicate. We close this window and inside the left column of XCode we go down until we find the folder Targets identified by a red and white target, inside which we find an entry with the name of the project we have created. Double-click on this row, select the tab Build, taking care to select from the drop-down menu as Production configuration, we type in the field Code Signing Entitlements, the name of the file Entitlements.plist and in the field Any iPhone OS Device we choose the provisioning profile we have created. We close this window, verifying that in the drop-down menu Overview is selected Device e Production. We compile the project (Button Build). At the end of the operation we will find the file name project.app inside the folder PRODUCTS of the left column of XCode. We drag this file to the desktop and press the right mouse button to select the item Compress which will create a .zip file. For testing and AdHoc Distribution just change the provisioning profile before compiling.
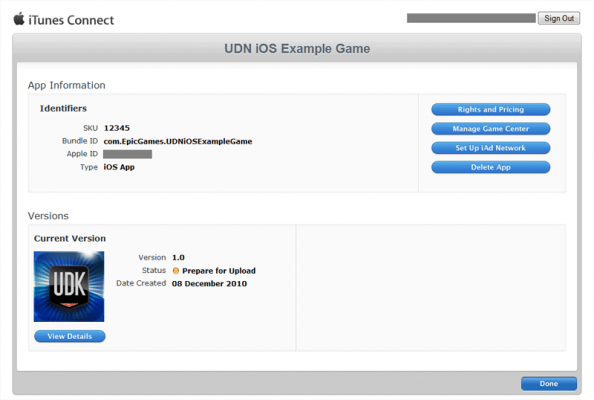
iTune Connect
Before accessing iTunes Connect, you need to create some images of the application:
- one or more screenshots of the application in compliance with the required dimensions. For iPad the maximum is 1024 × 768 or 768/1024, for iPhone 3GS 320 × 480 or 480 × 320, for iPhone 4 640 × 960 or 960 × 640. It is also possible to provide smaller dimensions in which the bar at the top showing the status of the device (Wi-Fi, battery, etc.) is omitted.
- an image of 512 × 512 pixels (Jpg or Tiff) that will be used by Apple on the Apple Store page associated with your software.
All information on the size of the images is shown in the iTunes Connect Developer document, which can be downloaded from the Apple website. Let's access iTunes Connect and go to the section Manage your Application, click on the button Add New Application. If we do not use encryption systems we respond DO NOT, if we use the functionality of iAds (for Sdk from version 4 and later) we reply SI or DO NOT if we want to limit the display of contents and click on the button Enable iAds, otherwise we proceed.
Let's set the software name in English with a brief description. Yes or No if the software can only run on some devices. We set the copyright category, version number, sku number (software name), keywords to allow it to be found when searching iTunes, and support information.
Let's move on to the page RATINGS: here you select the fields that identify the type of your application. On the page Upload you will have to send the zipped file of the software, the 512 × 512 icon and the various screenshots (select Choose File for each single file you want to insert).
On the PRICING page: you can decide whether to release your application for free or with a sale price, configure possible promotional periods for prices and whether to limit the sale only in some stores. Most of these settings are editable even after publishing.
Now that we have sent all the information to Apple we have to wait to find out if it has been approved or rejected with suggestions from the Apple review team to correct any problems. In the case of publication of a paid application (or that includes the iAds service) it is necessary to register your bank details in advance in the section Contracts, Tax & Banking Information, by entering the IBAN code of your current account. For download statistics these can be found in the section Sales and Trends e Financial Reports, or just download to your phone iTC Mobile App, Apple's free application for iPhone and iPad.
I have dwelt a bit but I hope I have not omitted anything.
Good App!