A useful guide to choosing and installing a CD-Changer yourself on your car, to never run out of music.
Introduction
The reasons that can lead to the installation of a CD-CHANGER (from now on we will call it CD-C) are multiple. The first could be that our source does not have a CD player, the second is that of having greater comfort not being forced to constantly change CDs.
Almost all the latest generation sources are designed for the connection of a CD changer or rather a CD-CHANGER. These can be 5, 6, 10 and 12 discs, prepared for Mp3 or DVD.
Suffice it to say that a 12 disk CD-C can give us over 14 hours of listening without interruptions and distractions from driving. Another possibility is to be able to have compatibility with Mp3 files without having to change the source and therefore have our entire music library on very few CDs.
Finally, a CD-C is practically indispensable when you have on board a GPS satellite navigation system with CD / DVD cartography, as it allows you to listen to your favorite CD collection without giving up the valid support of assisted navigation.
Choosing the CD Changer.
Buying a CD Changer for your car is not an easy task, in fact you must first find the products that best meet your needs, then you will need to identify the models compatible with your source.
A huge limitation in choosing a CD-C is in fact that of necessarily having to buy one compatible with your system: you cannot, for example, mount a source of one brand and the CD-C of another, with some very rare exceptions. and always with dedicated connection interfaces.
Unfortunately, this limitation could imply the renunciation of interesting functions such as the playback of DVDs or MP3 files (as in the case of the system we have chosen, for which CD-Cs with support for these standards are not available).
It is hoped that in the future manufacturers will create a universal standard so that the customer has a 360 ° choice without any constraints.
Source disassembly.
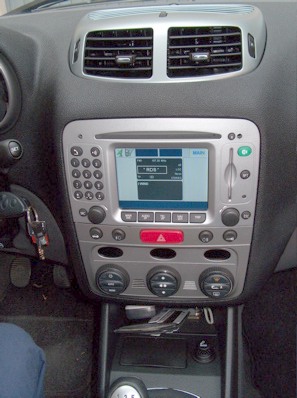
The source examined is the Connect Nav + mounted as an option on the Alfa 147 and on the other cars of the Fiat, Lancia and Alfa Romeo groups. The procedure, however, is valid for the other standard sources that equip the cars of the group.
This tutorial is designed in such a way that it can also be of valid help to those who have a source other than those listed above, as long as you choose the compatible CD-C.

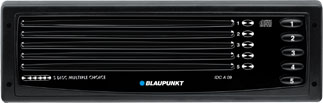
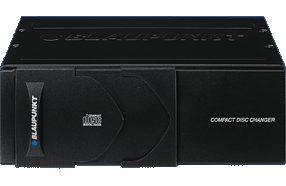
Given the lack of universality of connection of the Connect Nav +, the choice fell, necessarily, on the CD-C A03 or CD-C A08 produced by Blaupunkt and available online or in major Hi-Fi stores. For our tutorial we used the A03 which is also compatible with CD-Rs.

Before starting the installation, you must first obtain the necessary tools:
# of the pieces of iron that we will use for the extraction of the source
# a wire stripper pliers or common wire cutters
# of good quality electrical tape
# wrenches and screwdrivers suitable for disassembling some parts of the car for laying the cable up to the boot
The first step is to remove the NEGATIVE terminal (-) of the battery, since we will have to obtain the power supply of the CD-C directly from the 12v of the source.
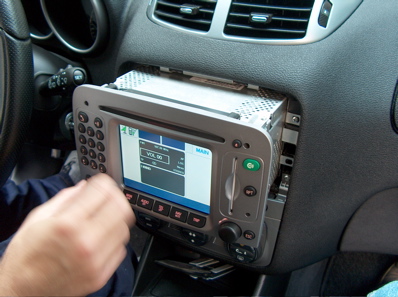
Once this is done we move on to Nav + extraction; proceed to disconnect the ISO terminal block (present on all the latest generation cars) and the fake BLUE connector that we will replace with that of the cable supplied in the changer package.
CDC connections and fixing.
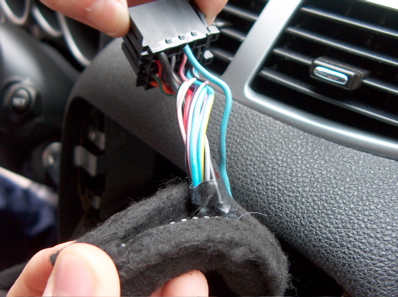
At this point, once the source has been extracted, to make the CD-C work, we need to power it. To do this, the RED-BLACK (+) and BLACK (-) wires on the ISO terminal board must be stripped without damaging them.
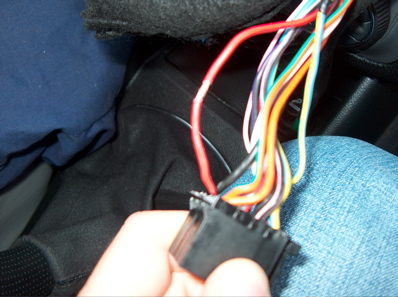
Once this simple operation has been completed, we take the RED (+) and BROWN (-) wires of the CD-C cable (protected by a fuse) and temporarily connect them to the (+) and (-) of the ISO terminal board, connect the charger to the 'other end, load the cartridge with some CDs, reinsert the (-) battery clamp and if everything has been done correctly we will hear the changer "wake up" and start scanning the discs present.
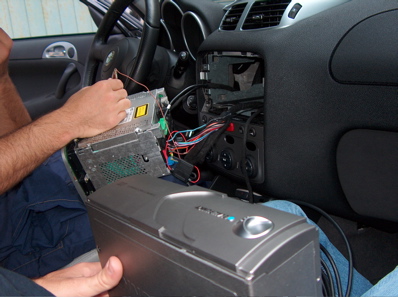
We just have to turn on the source, after inserting the ISO terminal block, and start the CDs.
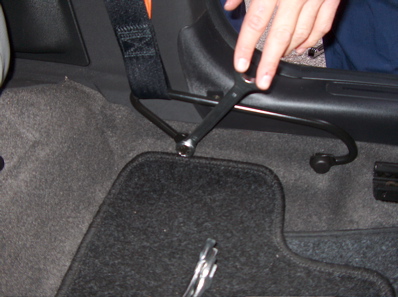
Now all that remains is to route the cable to the trunk. We have chosen to pass it on the driver's side. We disconnect everything again and begin to disassemble the driver's side seat belt support with a common wrench (we recommend the utmost caution and attention when reassembling this essential component for safety).
We then move on to removing the door sill, which is fixed with two star screws at the ends. We pull the whole piece hard and we will see that after a bit of resistance it will come off.
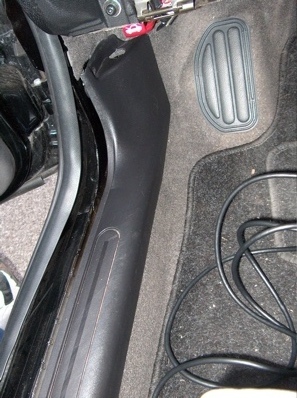
We raise the rear seat and recline the backrest a little. We take the black end of the CD-C cable, insert it into the double DIN compartment trying to make it come out near the pedals with the help of a flashlight. Once this is done, we raise the carpet near the area where the fuel inertial block device is generally housed (for more info consult the use and maintenance manual of your car) and begin to insert the cable, and then lay it along the stops. cables present under the door sill.
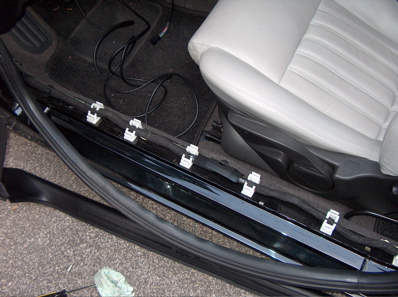
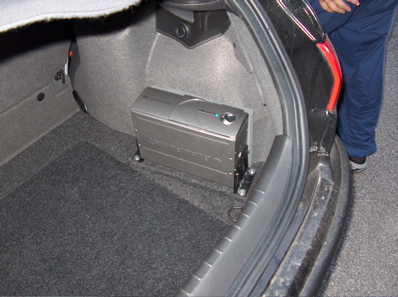
We get to the rear seat, pass the cable under the soundproofing to make it come out in the rear trunk. At this point we just have to fix the changer. Quietly choose the seat that suits you most. For fixing you can use double-sided adhesive tape or the special screws supplied in the package, taking care, when puncturing, not to cut any car cables.
We recommend positioning it like this:
Now, before reassembling everything, let's do the classic test of correct functioning. Reconnect the charger power supply to the ISO terminal block, permanently this time, with electrical tape.
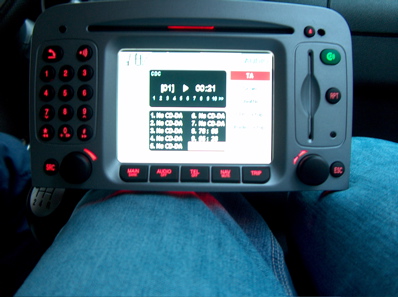
Let's put the Nav + back in its DIN compartment and enjoy our CDs.
Conclusion and suggestions.
In this article we have seen how simple it is, for those with a minimum of manual skills and patience, to install a CD Changer on their car.
After this operation the qualitative rendering of the audio will be even better, as the player integrated in the CD-C has a much better suspension system than that of the player generally integrated in the source, and therefore in the presence of roughness of the mantle. road has a lower tendency to "jump".
As always, for any clarification or doubt, we invite you to write on our forum.
Article published in Hirc on November 2, 2004 by the same author.