A few months after the release of Pokemon Sword and Shield, most of the users turned to the beautiful and labyrinthine competitive component, never as accessible as in this generation.
Did you finish Pokemon Sword and Shield by beating the League? Has the hunt for the legendary been completed? Have you completed the Pokédex or don't you want to throw your heart and soul into this mission? Well, then change the game! Indeed, no; do not do it. I am writing this guide just for you, to help you dive into the competitive online component, in which you can challenge coaches like you, more or less experienced. And if you feel overwhelmed by so many mechanics, so much that you don't know where or how to start, you are in the right place: this guide was written for you!
Part One: Capture Your Team's Parents!
Diving into competitive Pokemon is not just a matter of good Pokemon but of a good team. You can do nothing against experienced people if your team is not homogeneous and does not act in harmony. To get to this you will have to think and start devising a strategy map in your head.
However, if you still have no ideas you can try these rental teams: just click on the Pokeball icon, wait for the image to open and enter the code below as a "secret gift" directly in the game. You can later find the team in the Battle Tower - which I'll talk about later - and rent it at no cost, neither real nor in game currency. Once rented, every time you play either online or in the Battle Tower you can select and use it, thus learning to manage that team and decide whether you like it or not. In fact, if you want to participate in any tournament, the team must be made up of you. On the other hand, if you want to settle for playing a few games online, you can stop here, you've hired your team and you're good to go!
The rare raids.
If you are reading on, you are surely someone who does not want to play and settle for the stuff of others, so welcome officially on board this new magnificent and exciting adventure!
Returning to us, my advice is aligned with that of the international community, which sees in rare raids - the purple ones, so to speak - a great start to find the parents of our future team members, as well as some Gigamax Pokemon, which it never hurts.
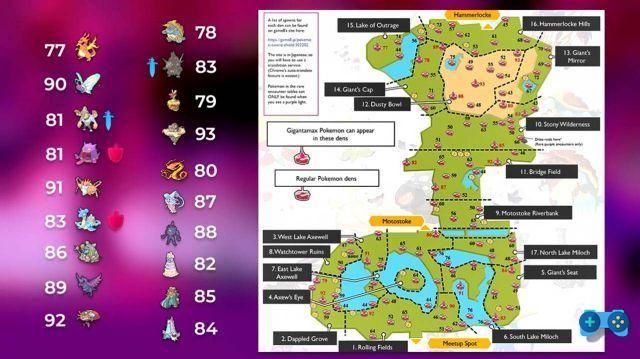
According to the list drawn up by the Serebii.net site, each den gives the possibility to find certain monsters, to the detriment of others and versions. Don't know which hole to get into? Consult this list, to get an idea! If the lair is empty, you can throw a Desioblocco to force it. If the light that comes out is red, the Pokemon that will appear is one of those listed in the normal list, while if the color of the ray is purple, a rare Pokemon will appear.
The number of stars in the upper left will indicate the difficulty of the raid, as well as the minimum number of perfect IVs of the Pokemon in question. However, it should be noted that five-star raids always guarantee a minimum of four perfect IVs and not five. Unless you're hosting the raid, capturing won't be easy. Therefore, now is the time to use the Master Ball or - better still - the Bis Ball, which works excellently on Pokemon already registered in the Pokedex, guaranteeing a capture rate three times higher than a normal Pokeball.
Infinite raids.
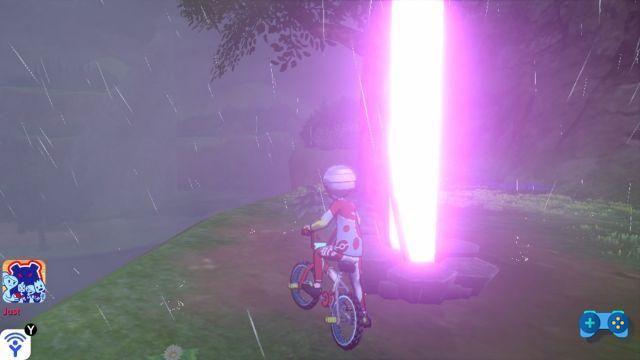
Now, this couldn't be said, so pretend you've never read it but you already knew it. There is a way to force both the appearance of a rare raid and - later - its difficulty. First, save your game before entering the Desioblocco, canceling the auto-save and setting the scrolling of the texts in the "slow" option. Once this is done, throw the "desioblock", agree to save the game and, as you can see the color of the laser, press the Home button on the console. If the ray is purple, go to the next step, otherwise close the application and restart it, repeating this step. It seems fair to warn you that this procedure could corrupt your save, but so far it has never happened to anyone.
We are on the second step, this means that your ray is purple. We set up the connection locally and enter the den. If the Pokemon is what you want - and we can see it from its shape - with the infamous five stars, come back online and immediately charge yourself; otherwise, I teach you how to force the game again to find the Pokemon you want with the difficulty you want. Once you have gone offline, enter the lair and start the "Play together". While the game will search for other users, press Home, go to Settings, User, Date and Time and set the date for the next day. Return to the game and exit match-making. As you can see, the lair holds the beam and is surrounded by a red halo. By selecting it, the game will reward us with 2000 Watts, which never hurt. Go back into the lair and repeat until you get the Pokemon you want!
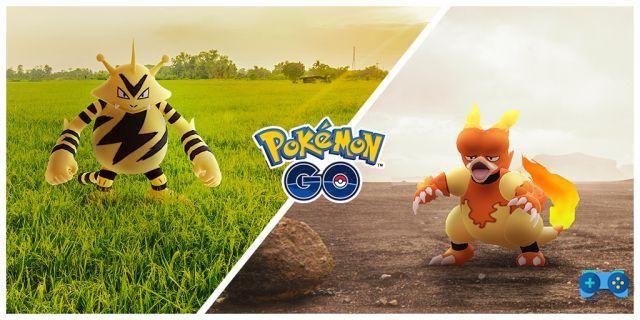
Ditto and many Watts.
As you will have understood, this procedure is excellent for collecting a disproportionate number of Watts! In fact, you can simply use it to collect Watts. Once finished, just set the Date and Time to Automatic to return time to the present, without any sort of technical problem.
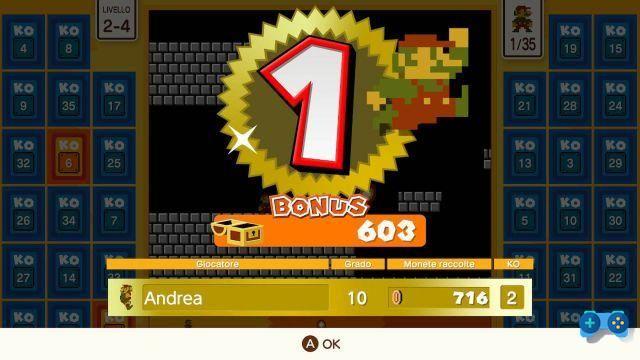
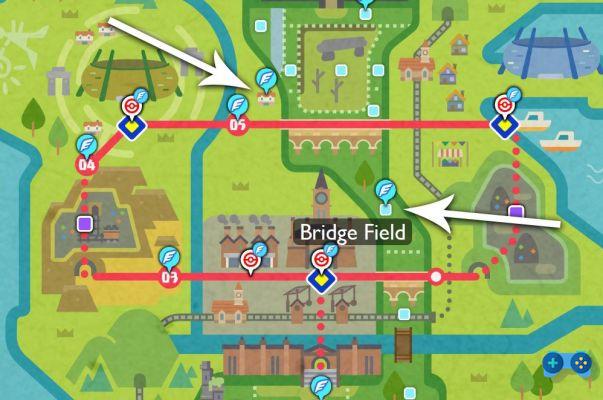
As for the very nice pink jelly, it can be found in the wild in Lake Dragofuria or - more comfortably - in lair 66, as in the photo below. Force the den as I taught you above and - within a few minutes - you too will be face to face with a Ditto Dynamax. And I give you another tip: if you show up with a legendary Pokemon of this generation (so O Zacian is Zamazenta, O Eternatus), as well as your teammates, his move Transformation it will always fail, making the raid a walk in the park.
Once you have captured the Pokemon, if you have reached Pokeball rank in one of the Battle Tower competitions, from the Box menu - by scrolling with the + - you will be able to see the IVs of your Pokemon. The written Stellar indicates that the monster has 31 IV, the maximum, while the writing Mediocre means 0 IV, perfect for Distortion when used in Speed. But I'll tell you about it later. If on a certain statistic you do not intend to distribute the PA (which I will explain later), the wording Excellent, indicating 30IV. In fact, if you don't make an AP increase in a stat, there is no difference between 30IV and 31IV.
Repeat this process as it is important to have a Ditto with at least 5 Stellar IVs or at least 0IV Speed. If you are tired of continuing to capture Ditto with 4IV and want to try your luck, press Y, go to Link Exchange, Set Password, enter 4448 and swap Ditto with other players around the world. In addition to helping you get Shiny Pokemon easier, you might get lucky and get a good Ditto with both the hidden ability and the stats you want!
Part Two: Raising Your Future Champion!
Once you have got Ditto and parent, you need to drop them off at the Pokemon Hostel. This is located on or on Path 5 just outside Turrfield or in the Piana dei Ponti in Wildland. If you have the right Pokemon left the process will be quite fast and will take about an hour for each Pokemon (variable time). Otherwise you will have to wait each time for a Pokemon with better statistics and replace it in the Hostel with the one previously left. Also, in order for the egg to hatch with half the required steps, you will need to have a team or a Centiskorch or Coalossal with skill Body of fire, which - in fact - takes less time to hatch the eggs.
Also, it is important to understand what skill to give your future Pokemon. In fact, each monster has three skill slots: two for ordinary skills, one for special skills. A parent with a normal ability will transfer one slot of the ordinary ones to the unborn child, and never the special one, while - vice versa - a special parent will transfer all three slots with random probability.
For example, Sableye has as possible abilities Still stare, Slow motion e Mockery. A parent with one of the first two will always and independently transfer one of them, and never the third. Instead, a parent with the ability Mockery will be able to transfer them all with the same probability. Remember, of course, that each Pokemon can only have one of those, and not all of them.
Su Pokemon Central you can safely see all the Pokemon with all the skills, statistics, learnable moves and much more, to get a clearer idea about your team.
The tools for breeding.
Usually, the tools needed for breeding your Pokemon are the following three: Pietrastante, Destincomune e Vigorgliera (optional). As for the former, it can be found at Turrfield, at the crossroads leading to the stadium, taking the road on the left. Otherwise it can be obtained as a reward at PokeID, as a tool collected by Brothers Miners or with a 50% chance as a tool held by the family of Rye rola. This stone allows the Pokemon to inherit the nature of the parent who holds it. Natures, in total 25, increase a given statistic by 10% (viewable in red) and decrease another by the same percentage (viewable in blue). For more details, see this link!
Furthermore, in the Pokemon Center in Knucleberg, for only 10PL, you can buy the Destincomune, a tool that allows you to make the unborn Pokemon inherit 5IVs from their parents, instead of the probable 3IVs that it would normally get. Also, if you need to pass the Speed with 0IV because you want to build a team based on the Distortion Zone, as well as a parent with Mediocre Speed, you will also need the Vigorgliera, always purchasable at 10PL in Pokemon Center in Knucleberg. This tool allows you with 100% probability to transfer the IV of the Speed statistic to the unborn child. There is - for the sake of completeness of information - a vigor tool for each parameter. Obviously, this is the only one that is actually useful.
The egg moves.
Compared to past generations, in this one making your Pokemon learn egg moves will be much easier. In fact, it will be enough to leave two monsters of the same species in the center of Pokemon, one of which with the move to be transferred and the other with an empty slot. It will suffice that both are of different sexes. Have them spawn the egg, refuse to take it, and simply retrieve the Pokemon that was supposed to learn the move. Et voilà, that's it.
A practical example: You have a Lapras male you want to teach Lyophilization. Well, spawn an egg of Lapras and make it hatch. Repeat until you have a Lapras female. Pair this up Lapras female with a Eiscue male who already knows this move. Pick up the egg and hatch it until you have another one Lapras female. Every unborn baby will already have that move, but you will need a female to mate with your original male. Once obtained, put the female and the male in the Hostel, reject the egg and collect the male. Here you go, a Lapras competitive with Lyophilization!
Part Three: How To Distribute Skill Points!
Skill Points are additional improvements to a Pokemon's stats. Each defeated opponent will donate one to three AP (or EVs, whichever they prefer) to each Pokemon on their team. Additionally, each monster can get a maximum of 510PA, and - even more restrictive - only 252PA at any single stat. Considering, among other things, that every 4PA the statistic at level 100 increases by one point, the total number of APs needed is 508, so the last two are completely useless. At level 50, however, only the first contribution of 4PA generates an increase, after which only every 8PA will the desired statistic increase by one point.
Proteins and feathers.
A great way to quickly increase a Pokemon's AP is through the use of Proteins. For the modest price of 10.000 pokedollars each, you can buy at Goalwick Pokemon Center the proteins that increase by 10PA each are a statistic. These tools are as follows:
- PS-SU for Health Points;
- Protein for the Attack;
- Iron for Defense;
- Soccer for the Special Attack;
- Zinc for the Special Defense;
- Carbon for Speed.
This means that each Pokemon costs you around 500.000 pokedollars. Since they are not enough, as an increase can reach 252PA, you can get Feathers that increase certain stats by one point in the bridge to west of Steamington Gym and in the bridge over the Path 5. Please note, in these two points the Feathers recharge every day, and can be collected again.
Rise by battles!
As an alternative, having your Pokemon fight is another alternative to increase your little monster's AP. Each opponent gives a minimum of one AP to a maximum of 3. Watch out, however, some Pokemon give an AP in two different stats, or one and two, or vice versa. For ease, I'll tell you which Pokemon give the right AP and how to find them quickly:
- Skwovet, found in Path 1 and in Path 2, will donate a PA in Health Points;
- Chewtle, found in Path 2, will donate a PA in Attack;
- Rolycoly, found in Path 3 and in Galar mine, will donate a PA in defense;
- Gastly, found in the Ruined Tower at the Earth Wild, will grant a PA in Special Attack;
- Nickit, found in Path 1 and in Path 2, will donate a PA in Special Defense;
- Rookidee, found in Path 1 and in Path 2, will donate a PA in Speed.
Not only that, the vigor tools can intervene in your favor, to increase your AP training even faster through battles. In fact, at the cost of halving the Pokemon's Speed, each tool increases the increased stat by an additional 8PA. Here are the tools, which I remember can be purchased at Pokemon Center in Knucleberg at the modest cost of 10PL the one:
- Vigor weight for Health Points;
- Vigorcerchio for the Attack;
- Vigorfascia for Defense;
- Vigorous for the Special Attack;
- Vigorbanda for the Special Defense;
- Vigorgliera for Speed.
If you want, at the same price you can take the Crescicappa which offers the same penalty - speed halving - but allows you to double the AP received, whatever they are. Finally, honorable mention for the Pokerus, a virus in the game that - if caught - doubles the growth of the PA even more, although the infection, unfortunately, is totally random. I will make a clarifying example. If I KO one Skwovet while your Pokemon is infected with the Pokerus and has the Vigor weight on him, the increase in AP will be 18 points, calculated as follows:
(1 basic + 8 vigor instrument) * 2 by Pokerus
The berries.
If in the AP distribution you noticed that you have incorrectly increased a stat, don't worry, the following berries will allow you to raise 10 AP at a time and will increase the bond of affection of your Pokemon, essential to increase the effect of certain moves or to increase the probability of a critical hit:
- Baccagrana, for Health Points;
- Codfish, for the Attack;
- Baccaloquat, for Defense;
- Baccamelon, for the Special Attack;
- Baccauva, for the Special Defense;
- Baccamodoro, for Speed.
How to see the PA.
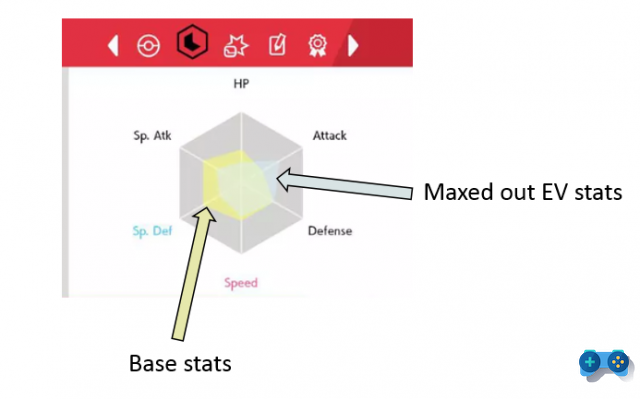
To see how many AP you have given your Pokemon, the method is super simple. Just open the menu with X, going up Pokemon, then - either from the team or from the box - select the reference monster and press on Info. From there, move to the stats window and press X, the PAs will be represented by the orange lines or - if you have distributed all 510 - blue. Furthermore, if a statistic has been maximized, a crown of stars around it will show you this important milestone.
Part Four: The Battle Tower!
Once you defeat Champion Dandel, you will have access to the Battle Tower, located in place of the old Rose Tower. In addition to being able to immediately obtain a Type: Zero, you'll have access to other competitive benefits, including Pro Workout and additional stores.
The Pro Workout.
If you've raised your Pokemon to level 100, you'll be able to access Pro Training, a mechanic already introduced in Pokemon Sun and Moon. The Coach in question, in exchange for a cap, will bring certain stats to IV Stellar. Caps can be silver or gold. I'll show you now what they do, below:
- Silver cap, obtainable at the Battle Shop at the Torre Lotta to 25PL, through Dynamax Raid or via Brothers Excavators, brings a statistic to the maximum of available IVs, 31;
- Gold cap, obtainable through Dynamax Raid or via Brothers Excavators, brings all statistics to the maximum of available IVs, 31.
Battle points, abbreviated to PL, can be obtained by fighting in the Torre Lotta and by rising in rank or fighting in competitive online under the heading VS of the main menu a - even there - by going up in rank. Important to point out, Pokemon trained in this way instead of the wording Stellar will be in possession of the wording At the top, to distinguish them from Pokemon with IV to 31 of nature. Furthermore, the IV Al Top are not transferable through breeding.
Mind and other tools.
Finally, to 100% complete your Pokemon, you will need to give it the right nature. At this point in the guide it is assumed that you have already done so. If not, don't despair. With only 50PL you can buy al Fight Shop area of Torre Lotta a Mint which changes the nature of your Pokemon. Pay close attention to what you want to buy, because it is a very expensive investment! As for IV At the top which are not transferable via Destincomune, even natures changed through mind are not transferable through Pietrastante.
My personal advice is to use Mind e Pro workout for non-breeding Pokemon, such as Fossil Pokemon and asexual Pokemon, excluding Rotom, which can only reproduce with Ditto.
Also, if you have noticed that you also have the wrong Skill (and what have you done so far, sorry?) And it is NOT a Special Skill, from the seller next to that of the minds you can buy for others 25PL a Skill capsule, tool that changes the normal Abilities of Pokemon in the event that the monster in question has two available.
Part Five: the tools!
Each Pokemon will necessarily have to assign a fight item or a berry, since you will not be able to use items from the bag and the only way you have to improve the statistics during the game is this. Every important tool usually has malus, which are the inability to use certain moves, which is the breaking of the tool and therefore the disposable or which is the activation of a negative state condition.
For more information on the fight tools, I refer you to this page. Of course it is a personal advice to know how to combine the tools. For example, never give to a Mimikyu a Focus, as it is useless, as is giving it to Pokemon with high defensive and HP stats, as they will hardly suffer an OHKO move. Or, only give an Assault Vest to a Pokemon that you know sins in Special Defense, but doesn't have it too low. For me, under 40 Special Defense the AV loses its effectiveness.
Last tips
The competitive of this generation is heavily based on weather conditions and speed control to be able to strike first. Therefore, skills such as Remasabbia, Swim swimming e Chlorophyll they will hug very much those who can place sandstorms, rains or suns flying with their respective skills Sand river, Piovischio e Drought. In the absence of skillful setters, obviously the moves Earthstorm, Rain dance e Sunny day they will set these conditions, as well as the moves Dynamax Dynamacigno, Dynaflux e Dynaflame.
In these cases leads with Pokemon are very frequent at high levels Tyranitar e Excadrill, Pelipper e Barraskewda/Ludicolo e Torkoal/Charizard e Venusaur/Leafeon. As you can see they are composed of a very defensive Pokemon and a very fast one, even more so under their own weather conditions.
Again, the check can be done with the move Ventoincoda, which doubles the speed of the team that uses it for five rounds. Leads in this case usually consist of Whimsicott e Charizard/Arcanine. Also, the former is almost always played with Focalnastro, remember this when you want to knock him down, as giving him a second shift many times is fatal, despite being just a good setter and nothing more.
Finally, the last Speed check is done below Distorted area. In this case the leads are composed of the setter and a redirector. The first is the one who places the distorted dimension, and usually responds to the names of Dusclops, Hatterenee, Reuniclus, Chandelure, Bronze, Gothitelle, Malamar, Gardevoir, Gallade e Mimikyu. The last three are almost always used in an offensive manner, while the others are always and only to place the distorted dimension. Redirectors usually respond to the names of Togekiss e Indeedee, since their goal is to lure with I'm here he moves them on them to make his teammate place the Distorted area. In their place, they are used from time to time Incineroar, Sableye, raichu, Meowstic, Grimmsnarl e Togedamaru, than with theirs At close range they cause hesitation and also disable the Focalnastro.
To overcome these problems, remember to build a balanced team, made up of two main cores, in order to be both very fast and very slow as needed. Then match with Pokemon like Charizard, Venusaur, Dragapult and other fast to slow Pokemon like Rhyperior, Mudsdale, Torkoal e Hatterenee to be able to face any situation. In addition to brute-force Pokemon, remember to place defensive Pokemon that can place barriers and attract attacks or increase the statistics of your companions.
In order to understand how teams work well and what a good team building can be I send you to these Showdown and Pikalytics links, which allow you both to create a team online and try it for free against other users and to see how certain Pokemon are played, with what tools and with what distribution of PA and Nature. Look here instead if you want to find out how to build a competitive team.
Have you already seen our review by the way?