Things are just like this, right? Perfect, then let me tell you: you are in the right place, at the right time! Indeed, in the course of this tutorial, I will explain to you how to setup OBS at best, both for live streaming and for recording video to be uploaded to the Internet at a later time.
Index
Preliminary operation
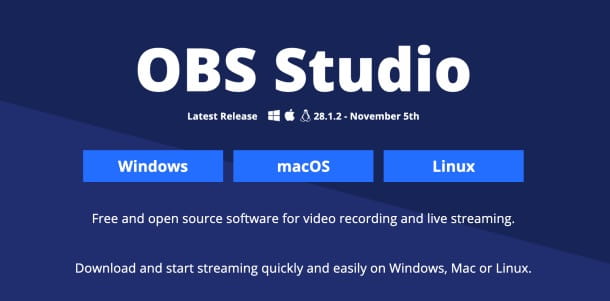
Viewer discretion, acronym for Open Broadcaster Software, is an open source program, widely used to carry out streaming transmissions and local recordings of the screen of your PC (with the possibility of adding a webcam or other video sources). The software is available for Windows, MacOS e Linux and it's completely free.
First, I show you how to install OBS Studio. Connect to the official website of the program and click on the button Windows, to start the download of the installation package dedicated to the Microsoft operating system, or press the button MacOS and choose whether to get the Mac-dedicated setup file with CPU Intel o Apple silicon (CPU installed on all Macs later than MacBook Pro developed in 2020).
Now if you are using Windows, run the installation package you just obtained (e.g. OBS-Studio-[xx.yy]-Full-Installer-xx.exe), push the button Yes to overcome the limitations imposed by Windows and click on the buttons NEXT e I Agree, to accept the license to use the program.
On the next screen, click on the buttons NEXT e install to start the actual setup of the program and, finally, press the button Finish, to complete the software installation and start OBS.
Se, invece, stai using MacOS, run the file obs-mac-[xx.yy]-installer.pkg that you downloaded earlier, click the button Continue for two consecutive times, then press the button Install and, when prompted, enter the Mac admin password in the appropriate field.
Finally, press the button Install software, wait for the package setup to complete and press the buttons Close e Move, to finish the procedure and move the installation package to the trash.
From now on, you want to know how to set up OBS on Mac o how to set up OBS on windows, the procedures to be followed are almost the same.
How to set up OBS at its best
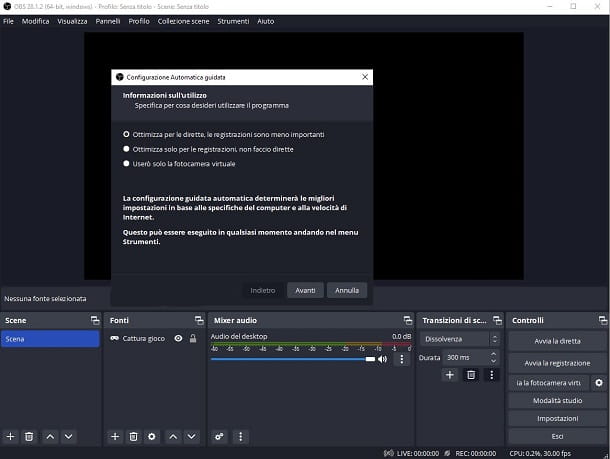
Once you have finished installing OBS, when you first open the program, you should be asked whether to proceed with the settings configuration wizard. Also, you may need to check the permissions you grant to the program, especially if it is install on Mac.
In this case, click on the keys Open Screen Recording settings and check the program Viewer discretion in the section Privacy and Security of the Mac. Do the same by clicking on the button Open Accessibility Settings, then press the buttons Request Access for the microphone and for the camera. Finally, press the key Continue.
If, therefore, you deem it appropriate to set up OBS using the guided configuration, click on the button Yes and follow the procedure suggested on the screen.
Therefore, specify whether to optimize the program for live broadcasts or for the Recordings, or if you only use the virtual camera, placing a check mark next to the appropriate item; click on the button NEXT twice consecutively (in order to select the values of resolution e Default FPS) and, if you have chosen to optimize the program for live broadcasts, select the service of live streaming you prefer from the appropriate drop-down menu. To connect OBS to the chosen platform, use the appropriate buttons for connect the account or enter manually the broadcast code.
Once you have defined the most suitable settings for your case, press the button again NEXT, complete the automatic configuration procedure by clicking on the button Apply settings, And that's it.
Personally, I recommend setting OBS's audio and video settings manually for optimal performance based on the quality of your Internet connection (for streaming) and/or screen quality (for recordings). Find it all explained below. I remind you that the suggestions I'm going to give you are valid for both Windows PC and Mac.
However, on macOS to capture the internal audio of the computer you need to install third-party software: if you want to know more, I refer you to my guide on how to record the Mac screen with internal audio.
How to setup OBS for streaming
In order for the OBS parameters for the streaming are optimal for you, thus avoiding the possibility of delays or interruptions in the transmission, I advise you to check the value of the band in upload (or in broadcast) actually obtainable from your internet connection.
You can obtain this information in two different ways: by reading it directly from the contract stipulated with your operator (in this case, however, you would only get an estimate of the average/effective speed); or by making one speed test from the PC you intend to use, following the instructions I gave you in my tutorial dedicated to the subject.
Either way, once you get the information you need, you're ready to find out how to set up OBS for Twitch and other streaming platforms: open OBS and go to the menu File > Settings (or, alternatively, click on the button Settings located at the bottom right). Once this is done, click on the tab direct (on the left), indicate the platform on which you intend to stream, using the drop-down menu Service, and, depending on the choice made, connect the account to the program (by clicking on the appropriate button and entering, when requested, the access credentials for the chosen platform) or use the Stream key in the text field displayed on the screen.
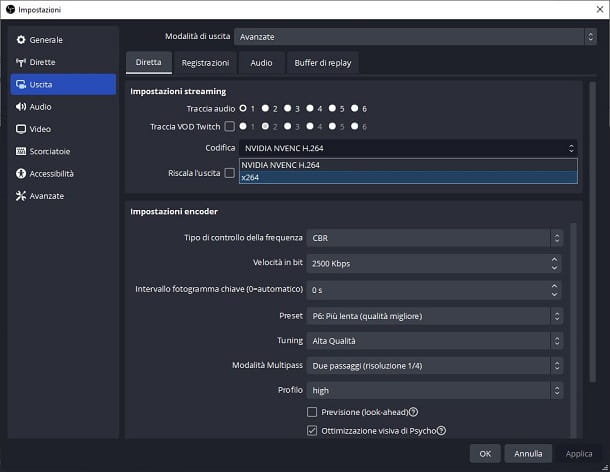
After that, click on the tab Dismissal (left), set the drop-down menu Exit mode su Advanced and click on the section Live score, which is located immediately below. Now, select the audio track to be used for playback of the sound stream (usually it is 1) and choose to apply the encode x264.
At this stage, if the display you are using has a very high resolution, I suggest you put the check mark next to the item Rescale the exit and to select, using the drop-down menu located next to it, the resolution at which the live broadcast will then be broadcast. This trick is aimed at minimizing any transmission problems due to too high a resolution (which, in some cases, could be useless).
Next, set the dropdown menu Frequency control type su CBR and specify the value of Bit rate, based on the resolution you intend to obtain in streaming and the upload value of your Internet connection: in general, it is advisable to set a value between 2.500 and 4.000 kbps for making live broadcasts at 720p resolution, with 30 fps; for 1080p resolution, still at 30 fps, I would recommend setting a value higher than 4.500 kbps.
In any case, keep in mind that the bitrate value (expressed in kbps) it must not exceed 75% of your upload bandwidth: therefore, if, for example, you have a fiber connection with a value of 10 Mbps (therefore 10.000 kbps), you can "push" the bitrate up to 7.500 kbps, performing a 720p live stream with 60fps (or lower) without problems.
In any case, even if you have an Internet connection with a very high upload bandwidth, you shouldn't set the bitrate values too high: in fact, those who watch the live streaming may not have a fast enough connection and therefore experience problems viewing the video stream.
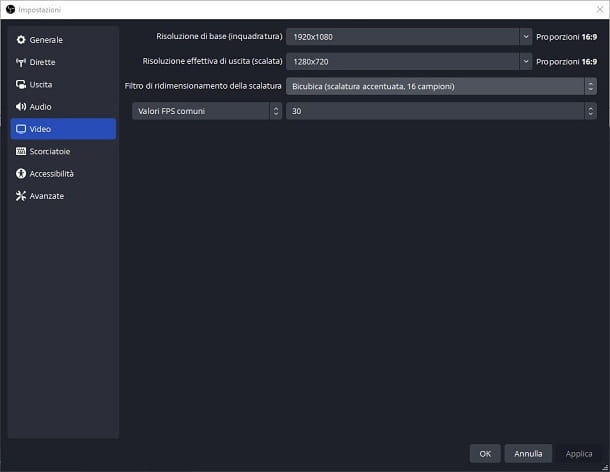
Once you have chosen and set the bitrate value, click on the tab Video (located on the left) and, following the tips I gave you just now, use the text fields Base resolution (shot) e Effective output resolution (scaled) to specify the capture resolution and the video transmission resolution, then enter the FPS values of your choice in the field Common FPS values.
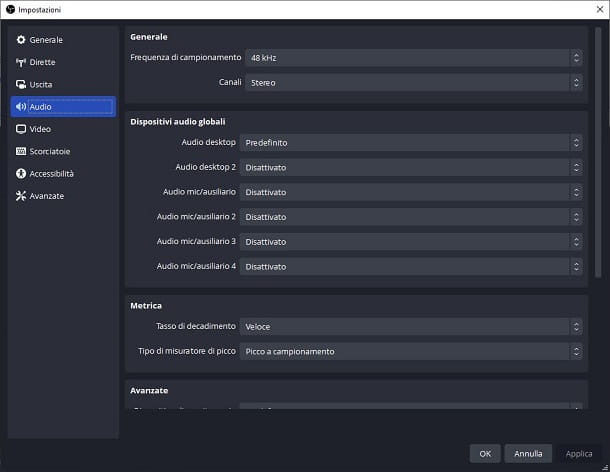
We're almost there: now go to the tab Audio, select the devices from which to obtain the audio track (if you don't know what to do, leave the default parameters unchanged) and finally click on the button Apply located at the bottom left, to confirm the changes made.
Having reached the OBS main screen again, all you have to do is select one or more video sources to send in streaming: then click on the button [+] placed at the bottom of the box Sources, select the first video source (choice between Browser, Game, Window, Video Capture Device (Webcam), Full screen and so on) and make, if required, the appropriate adjustments for the acquisition.
When you are done, click on the button OK and, if necessary, add all the other video sources by following the same steps seen above; finally, arrange the boxes on the scene, in the way you deem most appropriate and, to start the live broadcast, click on the button Start live located in the lower right. When you're done, press the button Stop live, to end the video transmission.
A function introduced in the most recent versions of the program concerns the set up of the Virtual camera. This option allows you to simulate the signal from OBS as that transmitted by a video camera, which can be used, for example, for video conferencing services such as Google Meet. The signal shown on screen will be the one you decide to capture via OBS.
To set this function, click the gear button next to the button Activate virtual camera, then choose from the on-screen menu whether to set a Type of output coming from internal camera, From one Scene or from Sources what have you chosen. Leave set to output program la Output selection, then press the key OK to confirm. Once this is done, click on the key Launch virtual camera to start broadcasting.
Note: if you want to set a delay value between video capture and streaming, go to the tab Advanced of the OBS settings, put the check mark next to the item Enableplaced in the box Live broadcast delay, and specify the Duration of the delay in the appropriate text field.
How to setup OBS to record
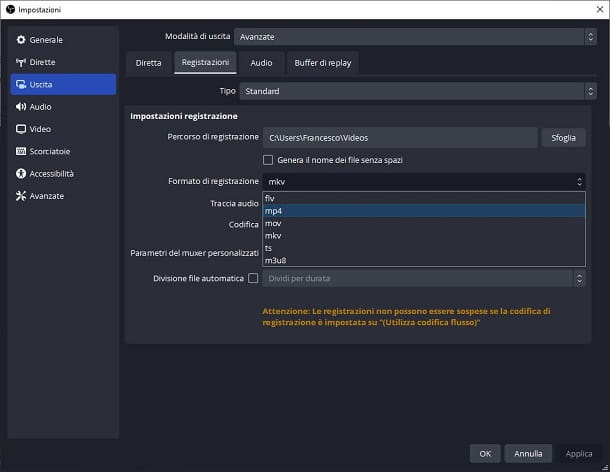
The precautions to keep in mind to understand how to set up OBS to record screen they are not as numerous as those seen for streaming, but they are just as important: to begin with, go to the menu File > Settings of OBS, click on the tab Dismissal and set the dropdown menu Exit mode su Advanced.
Now, click on the section Recordings (a little further down), set the drop-down menu Type su Standard and, within the text field Registration path, specifies the folder in which to save the videos made through OBS.
Next, indicate the recording format using the appropriate drop-down menu: it is a choice that you must make both on the basis of the size of the video file you intend to obtain, and on the purpose for which it is aimed. For example, choosing the recording format mkv, you will get a relatively small file visible from most PC operating systems; opting for the format mp4, on the other hand, you will have a slightly larger file available, but viewable from a large number of devices (smartphones and tablets included); if, on the other hand, you intend to upload the resulting video to an online platform, you can also use the format flv.
It's almost done: select from the drop-down menu Coding, the value x264 and, if you intend to record the video at a lower resolution than the one in use on the monitor, put the check mark next to the item Rescale the exit and select, from the immediately adjacent drop-down menu, the scale factor you deem most appropriate.
Finally, set the frequency control type su CBR and specify the bitrate to be used for registration within the field Bit rate: A higher value will allow you to use higher resolutions with framerates up to 60 fps, however it will result in a larger file size (I advise against using very high bitrates, the file may even be huge). Ideally, to get 1080p resolution video at 30 fps, you can set the bitrate to 4.000 kbps or higher.
Then tick the option Automatic file division in case you want to divide the recordings into several parts when the video files reach a certain size.
If you also intend to record the audio (e.g. the sounds played by the system), go to the tab Audio and set the item Audio desktop su default; if you are also interested in recording your voice, carry out the same operation on the drop-down menu Mic/auxiliary audio.
Finally, click on the tab Video, set the drop-down menu Scaling Resize Filter su Bicubica o Lanczos (depending on the scale factor you applied), set the common FPS value within the appropriate field and, when you're done, click on the button Apply, to confirm the settings you just specified.
After this step, all you have to do is add the video sources to record by clicking on the button [+] located at the bottom of the box Sources and, when you're done, click the button Start recording, to start acquiring content. To interrupt it, click on the button Finish the registration. It wasn't very difficult, was it?
How to setup microphone for OBS
Have you managed to successfully stream or record, but alas, realize you haven't streamed/recorded your microphone audio? No problem: in a few simple steps, it's possible set the microphone for OBS, in order to be able to acquire the audio during the recording/transmission of the contents. Let me tell you how.
First, check that your microphone is properly connected to your PC. Then, check that the microphone volume is high enough on the OBS main screen: locate the box Audio mixer (located below) and take a look at the indicator Microphone/auxiliary device.
To verify that it is active, make sure the iconspeaker, placed immediately below, is not colored red and followed by a x; if so, click on it to enable audio capture from the microphone again. Then, raise the capture volume to the necessary level by moving the slider located next to the volume icon to the right.
Once this is done, try to speak and check that the lines indicating the frequency go up and down, according to the sound your voice makes.
If the steps indicated do not have the desired effect, you can try to intervene on the advanced audio settings of the program: to be able to do this, go to the menu File > Settings, click on the tab Audio and, in section devices, locate the drop-down menu Mic/auxiliary audio.
When you've found it, click on it and set it to the entry default, or indicate the name of the sound card to which the microphone is connected and click on the button Apply for the changes to take effect. From now on, you should be able to transmit/record the audio captured by the microphone without any problems.


![[Solved] Android App Won't Open Problem](/images/posts/a150cb8db0eb50df4b79257485e3c04c-0.jpg)