This guide deals only with the correct installation and configuration of the PCSX2 emulator on the Windows operating system, its integration with the various frontends will be dealt with in the appropriate sections accessible via the menu at the top of the site.
Let's start the PCSX2 user guide with the download of the emulator.
Let's go to the official PCSX2 website https://pcsx2.net/ from the top menu select "Download Get PCSX2 here" and then select our operating system, in our case Windows, to download the latest stable release available.
Although the emulator is still under constant development and well supported by its programmers, the time between one new release and another can be very long, even several years.
During this period of pseudo inactivity it is therefore advisable to download the "Development" versions, i.e. versions of the emulator made available by the developers themselves with each modification of the program and containing all the modifications made to the software up to that moment.
Just go to the address https://pcsx2.net/download/development.html and from the table click on the word "download!" placed on the right side, the first available line, then from the page that will open, click again on the word "download" again on the first available line.
You can see by reading the "Age" column how assiduously new development versions are released, so imagine how many improvements are made to the program for example in a year of development, improvements that would not be available using the traditional or "Stable" versions.
Guide to conconfiguration of plugins PCSX2
PCSX2 is an emulator based on the use of plugins, so I will try to explain in this guide how to best configure them.
Extract the files just downloaded in a folder of your choice and click on the executable “pcsx2.exe” to start the emulator.
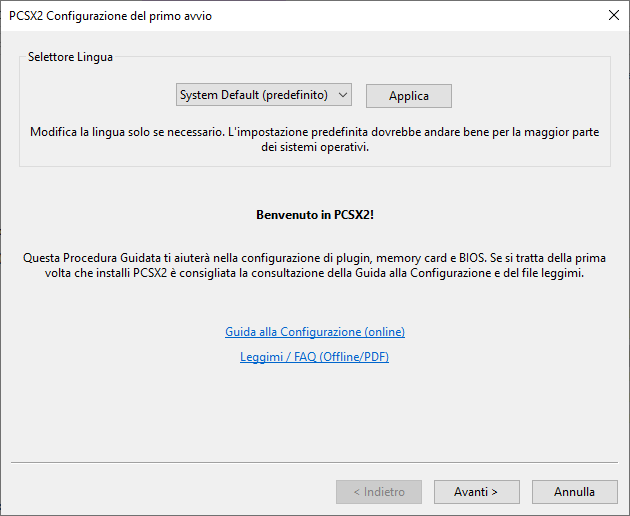
a first start configuration window will start automatically, the first window will ask us to choose the language to use, select "Italian" from the drop-down menu and click on "Next >".
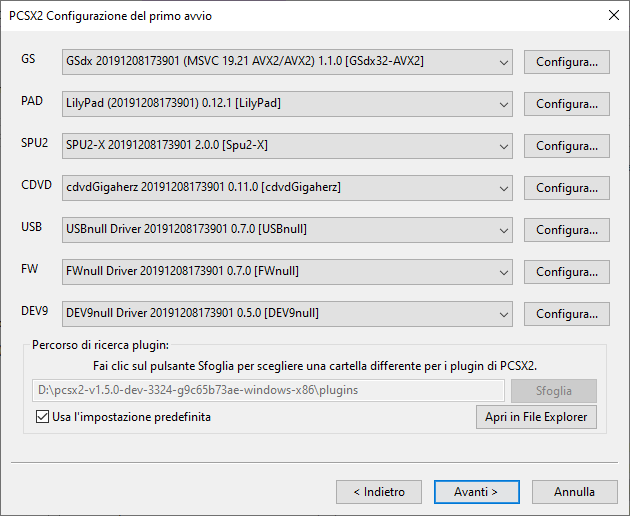
The following window asks us to confirm the plugins to be used when emulating games.
The "GS" field indicates the video plugins, very important and crucial to select the one that best suits our needs, "PAD" indicates the plugins for the controls, "SPU2" the audio plugins and "CDVD" that of the console's cd/dvd player .
The remaining lines are mostly unused and even useless plugins such as the plugin to emulate the console's usb ports or the Firewire port for the internet.
Plugin Video
A fundamental part of PCSX2 is made up of the video plugin and it is essential to configure it best by following this small guide.
Looking at the drop-down menu of the "GS" section, you will notice three or more apparently very similar plugins, differing only in the central and final part of the name.
Each plugin references a different instruction set and will have different performance, in order from slowest to fastest SSE2 > SSSE3 > SSE4.1 > AVX > AVX2.
Each processor supports a certain set of instructions, typically the newer the processor, the higher the number of supported instructions.
It is therefore important to select the plugin that refers to the most performing instruction set compatible with our CPU, if you have a relatively new PC, for example any Intel i3/5/7 CPU or an AMD FX, play it safe and select AVX or AVX2 if your PC contains CPU Intel i3/5/7 4XXX series or higher or AMD Excavator series or newer Ryzen.
if your computer is older, resign yourself to having to use the SSSE3 or even SSE2 plugin since you have no other options.
Configuration
We then choose the most suitable video plugin for us and click on the "Configure..." button on the side.
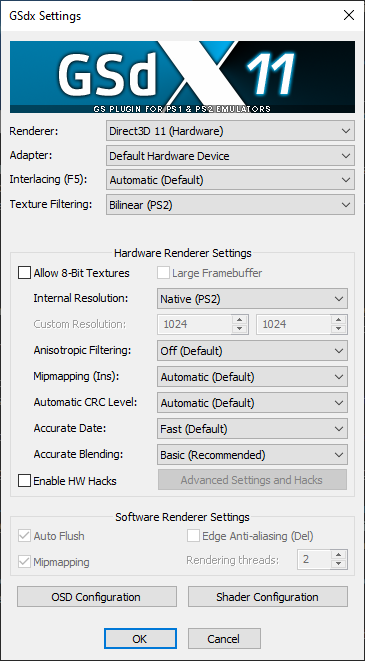
Here we should properly configure the video plugin to get the best results based on the computer we own.
First we choose the Rendering by selecting it from the relative drop-down menu, the items with the writing (Hardware) also allow the program to use your GPU to process the images, obtaining better performance and also allowing you to increase the game resolution, (Software) vice versa will entrust the task to the processor to translate and process the instructions coming from our "fake" PS2, thus obtaining a more faithful image to the original but lower performance and no graphic upgrades.
You will then have to choose between OpenGL and Direct3D 9, 10 or 11, it depends on the video card you have and the operating system, usually Windows users can easily choose the Direct3D plugin with the highest number while OpenGL is better suited to Linux users.
Typically if we have Windows we can choose the item "Direct3D (Hardware)".
In Adapter if we wish we can choose the video card to which to entrust the workload otherwise we leave it on "Default Hardware device".
We also leave the lines unchanged Interlacing e Texture Filtering.
If we have chosen a Hardware Renderer we will also be able to improve the graphics by modifying the items Internal Resolution to increase the resolution e Anisotropic Filtering to apply an additional graphic filter.
Leave the rest of the options unchanged and select ok to confirm the settings and return to the previous menu.
Controls Plugin
now select the only item available in the PAD menu or Lilypad and press “Configure…”
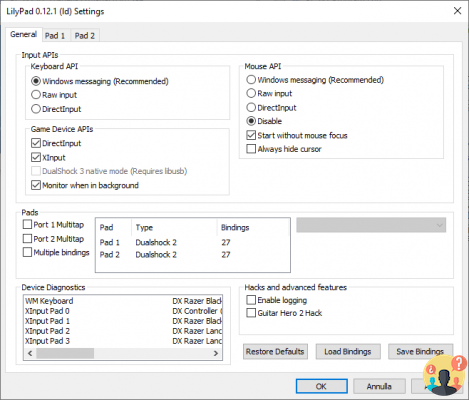
This window might be a little confusing but it's actually easier than it looks.
Under the "Game Device APIs" section you can enable or disable the use of certain peripherals in PCSX2, in this case "DirectInput" refers to peripherals such as generic Mice, Keyboards and Gamepads, "XInput" manages the use of Xbox 360 controllers and Xbox One while "Dualshock 3" as you can well imagine allows the use of the Dualshock controller.
Immediately under the heading "Pads" you can also enable the Multitap so you can manage 4 controllers instead of just 2.
Finally, in the "Device Diagnostics" section you will find a list of all the peripherals connected to your PC and usable by PCSX2, if you experience problems with the commands and you do not see, for example, your gamepad on this list, it means that it is not correctly recognized by Windows.
Vibration
Now click on the "Pad1" tab to access the control assignment screen.
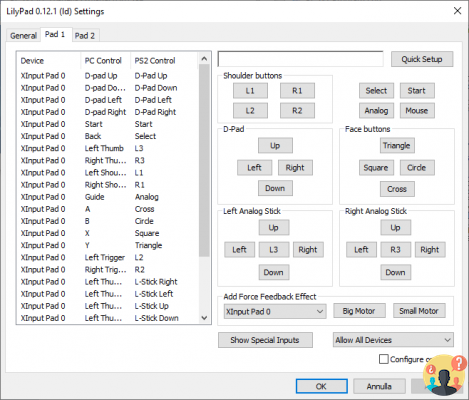
Depending on the pad you use, you may find the controls already assigned or partially inserted, in any case the "Quick Setup" button located at the top right will allow you to assign all the buttons to your pad (or keyboard) one at a time. text line in the upper part of the window with the writing "Please enter an input for" followed by the name of the key, at this point you just need to press the relative key on the pad to assign it and continue with the next one.
Alternatively, you can edit individual buttons by simply clicking on the relevant button on the right side of the screen.
In case of problems with the controls you can also check in the left part of the window that the button has actually been configured and appears in the list and that the button name is correct or that it has not been assigned twice, which is rare but possible!
Finally, in the lower part of the screen under "Add force feedback effect" we can configure the vibration of the controller.
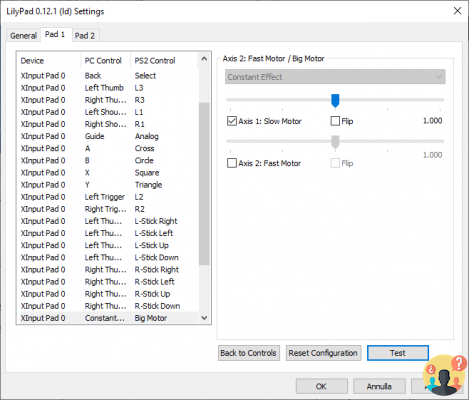
We then select the right peripheral from the drop-down menu, if you don't know which one to select, just look at the name that appears in the first column of the summary table of the controls on the left of the screen, Click on "Big motor" and then select one of the boxes present, press " Test" to verify that everything works as desired and then click on "Back to controls". Repeat the procedure also with "Small motor", on a classic xbox controller Big motor must be assigned to the "Axis 1: slow motor" box while Small motor to "Axis 2: Fast Motor".
If you wish, repeat the procedure with pad2 and once the procedure is complete, remember to click on "Apply" to save the changes and then on "ok" to return to the previous menu
Plugin Audio
The only item available here is the SPU2-X plugin so click on “configure…”

There are not many options to modify here and many of these do not need our attention, we can instead modify the setup of our speakers from the last item “Audio expansion Mode:” changing it from Stereo to Quadraphonic, Surround 5.1, Surround 7.1 according to the sound system we own.
Click on "ok" to return to the previous menu.
More options
PCSX2 integrates the possibility of loading games in ISO image format but if you intend to play original PS2 titles through the DVD player of your computer it will be useful to configure the plugin in the CDVD section, by pressing the usual "Configure..." button you will see a simple window in which to select the letter corresponding to your DVD player via a drop-down menu, select it and press “ok” to confirm and return to the previous menu.
This time we press the "Next >" button to proceed with the last step, the choice of BIOS.
It BIOS
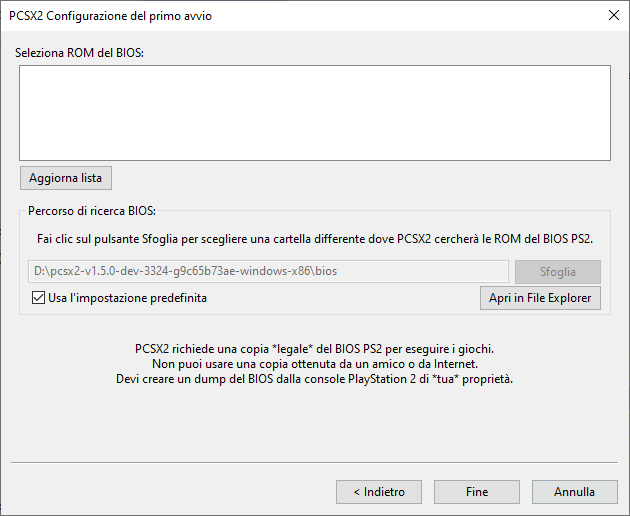
We have almost finished the wizard that will lead us to configure PCSX2 to perfection but we are still missing a fundamental part or the BIOS.
The list under "Select BIOS ROM" should stand out as completely empty, this is normal, just copy the BIOS files directly into the PCSX2 BIOS folder and click on "update list" to see it appear in the window.
Alternatively, if you are keeping the BIOS in a different folder, for example because you already own an old version of the emulator and you simply want to check what progress it has made in development, just click on "Open in file explorer" and select the folder containing the bios file.
Once you have selected the BIOS from the list, click on "Finish" to end the wizard.
PCSX2 main screen
Once the guided procedure described earlier in the guide has been completed, PCSX2 is practically ready for use and the main program window will finally appear.
Even if the name could change according to the version you are using, the structure of the menus doesn't change.
In System we will find commands to start games, the ability to save and load states, to pause and to enable widescreen patches (where possible) to play in 16:9
CDVD allows us to choose whether to load the games in ISO format by selecting them from the appropriate "ISO Selector" menu or directly from the player by selecting the "Plugins" item.
In Configuration in addition to all the settings already seen in the wizard, we can configure the plugins as we like and select new ones, while under "Emulation Settings" we will find further options to speed up the emulation if necessary.
Another useful function present in the menu Capture it will allow you to save screenshots or record videos of your gaming sessions.
Starting games
Let's continue the guide with the part you've all been waiting for, how to start games in PCSX2!
From the main screen of the program, move to "CDVD > ISO Selector > Browse" and select your game image, typically in ISO format.
Now go to "System > Start from ISO (Full)" to start the game with the complete boot and relive the thrill of seeing the console's main menu appear once again.
Alternatively "Boot from ISO (Fast)" will launch the game directly, useful for saving time or for launching games that refuse to start with full boot.
PCSX2 is an excellent Sony PlayStation 2 emulator and is perfectly compatible with RocketLauncher and all frontends capable of interfacing with it.
This practical guide will walk you through the steps necessary for the correct integration of PCSX2 to RocketLauncher.
RocketLauncher interfaces perfectly with Hyperspin, LaunchBox and many other frontends on the net, so this tutorial is to be considered valid for Hyperspin, Launchbox, BigBox and all compatible frontends!
Notice to LaunchBox users only!
If you haven't added RocketLauncher to your frontend yet then this tutorial is not for you!
If you are interested in the subject, follow my guide:
Aggiungere RocketLauncher a LaunchBox;
Don't go and be sorry!
Preparation
This guide assumes that you already have a copy of PCSX2 installed and configured on your computer, if not, first follow the PCSX2 user guide on the site.
Adding the system to RocketLauncher
For Hyperspin users only, if you use LaunchBox go directly to "Add database"
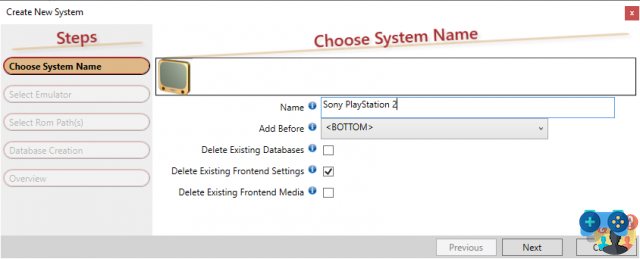
We open "RocketlauncherUI.exe" and press the green + symbol at the top left to add the new system and enter Sony PlayStation 2 in the Name field and click repeatedly on "Next" and then on "Yes" to finish the wizard.
By doing so, the system will automatically create all the necessary files and folders.
Making sure you have selected the new system from the left bar, let's move to the "Emulators" tab and click on the green + symbol to add a new emulator, if you are undecided on the symbol to press, stand on the icon for a few seconds and you will notice the writing " Add new emulators” to continue adding PCSX2 to RocketLauncher.
Adding the database PlayStation 2
LaunchBox
LaunchBox users will have to rely on the "Tools > Import > ROM Files" menu to import the ROMs needed by PCSX2 into the frontend which will automatically create the system and game database needed for RocketLauncher to function.
Hyperspin
We now need to add the games database file which is currently completely empty.
So let's go to http://hyperlist.hyperspin-fe.com/ and on the “Sony PlayStation 2” line click the orange icon with the word XML to download the database and then copy it into the homonymous folder inside “Database”.
The folder structure will be as follows:
“Frontend -> Databases -> Sony PlayStation 2 -> Sony PlayStation 2.xml”.
Emulator configuration
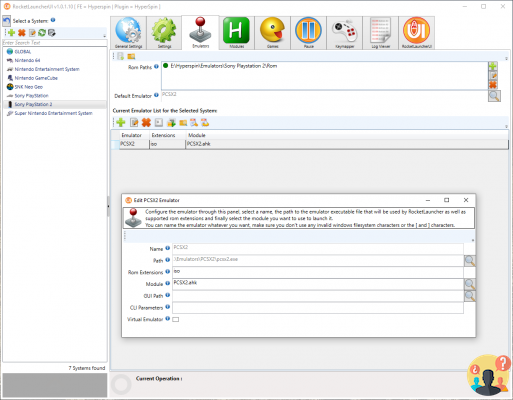
Insert "PCSX2" in the name field perhaps followed by the version of the emulator in our possession so as to distinguish it from other future versions that we could add in the future, in the path field click on the magnifying glass and choose the executable "pcsx2.exe" inside the emulator folder that you copied previously copied to “Emulators”.
The full path should look something like this:
“Frontend -> Emulators -> Sony PlayStation 2 -> PCSX2 -> pcsx2.exe”.
In Rom Extensions you have to put all the extensions present in your PS2 roms or those three letters after the point, they are usually .iso files but you could find other formats depending on the files in your possession.
In the Module field click on the magnifying glass and select the appropriate module from the list, “pcsx2.ahk”.
If you have done everything correctly you will notice that the emulator has appeared among the available emulators.As certainly done for other systems, click on the green + to the right of "Rom Paths" and select the folder where we keep all our PS2 games.
Then we select the magnifying glass next to the "Default Emulator" item and select the one we just added or PCSX2.
We're almost done! let's go back to RocketlauncherUI and from the "Games" section click on the second icon (the white and blue "Play" symbol).
A long series of green lines should appear, each line being a game correctly recognized by RocketLauncher.
If some lines (or all) are red or you have set the wrong rom folder or simply the "Name" field of the game contained in the .xml database file does not coincide with the name of the rom or we have not set the right extensions.
In fact, it is important that the roms are named correctly or the program will not be able to detect them!
Quick guide on media files
Congratulations you have successfully set up your PS2 on RocketLauncher! but to complete the job you can get the necessary media files online, you will have to put the files in these folders:
In the folder “Hyperspin > Media > Sony PlayStation 2“
“Images > Artwork” from 1 to 4 (depending on the theme used) for the images of the cartridges and covers;
“Images > Wheel” for the images containing the names of the games;
“Themes” for theme files;
“Video” for .flv or .mp4 files representing the previews of the titles;
You will also need to get the media files relating to the main menu:
In the "Hyperspin > Media > Main Menu" folder
“Image > Wheel > Sony PlayStation 2.png”;
“Theme > Sony PlayStation 2.zip”;
“Video > Sony PlayStation 2.mp4”;
If you have a Platinum subscription to the Hyperpin and Emumovies sites you will easily find the necessary files also via FTP, otherwise try to search on the sites indicated above or on google by typing "Play Station 2 Hyperspin Media pack".
LaunchBox / BigBox users can take advantage of the scraper built into their frontend to do most of the work automatically!


![[Solved] Android App Won't Open Problem](/images/posts/a150cb8db0eb50df4b79257485e3c04c-0.jpg)