However, you are perfectly aware that you don't have a clue about how to set up Streamlabs, because it's the first time you've approached the program in question: in short, you're afraid of not knowing where to put your hands and ending up even worsening the quality of your live shows. For this reason, you are looking for a guide who can teach you how to configure the program according to your needs. I guessed right? Well, then know that this is just the right guide to start with!
In fact, below I will provide you with an accurate overview of the options available in Streamlabs and I will give you practical indications on how this software works on PCs, smartphones and tablets, so that you can start your live shows in a short time and with very little money. effort from all platforms. So, ready to get started? Yes? Great, let's go!
Index
- Preliminary operation
- How to set up Streamlabs on PC
- How to set up Streamlabs on smartphones and tablets
Preliminary operation
It also offers the possibility to fully customize its interface thanks to a series of practical widgets and to view, in real time, the interactions of the public, even in-game. It is currently available for Windows PCs and as an app for Android devices (on the Play Store and alternative markets) and for iPhone and iPad.
To download the program to your computer, if you haven't already done so, connected to its home page and click on the button Download, top right. When the download is complete, run the file obtained (eg. Streamlabs+OBS+Setup+XX-abcd.exe) and click on the buttons Yes, Accept, Install e Close, to complete the installation process and launch the program.
If, on the other hand, you are interested in getting Streamlabs on your smartphone or tablet, download the app from the reference store of your device using, if you prefer, the links I provided you a moment ago.
How to set up Streamlabs on PC
You're on this guide because you want to start broadcasting live on your channel right away, right? Great, let's see then how to set up Streamlabs OBS correctly according to your needs.
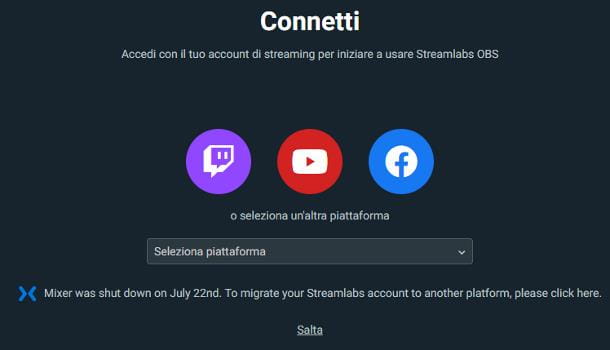
Once logged in, choose whether to import the settings from the software Open Broadcasting Studioby clicking on the button Importa da OBS/Import from OBS or whether to start the program configuration from scratch, by clicking on the button Start Fresh. In the first case, you will be offered a guided procedure, through which it will be possible to import scenes and settings from the OBS Studio software (which must be present on your computer): to start it, click on the button Start/Start and follow the instructions given on the screen.
In the second case, however, you will have to specify the settings relating to the operation of the program: to begin with, select the webcam and microphone to use for live performances, using the drop-down menus that appear on the screen. Using the upper panel and the control bar located in the centre, you can verify the correct functioning of the selected devices.
Now, click the button Continue / Continue and, if you wish, choose a theme to use for the OBS interface, choosing it from those proposed; alternatively, click the button Jump / Skip to go directly to the next step, during which you will be asked whether to join the subscription program Premium which, with prices starting from $14.08/month, allows you to unlock additional features, including the ability to broadcast live on multiple platforms simultaneously and to use animated boxes for interactions with the public (subscriptions, donations, and so on).
To opt out of Streamlabs Prime membership, click on the entry Jump / Skip placed at the bottom and that's it: if everything went the right way, you should now find yourself in front of the main interface of the program.
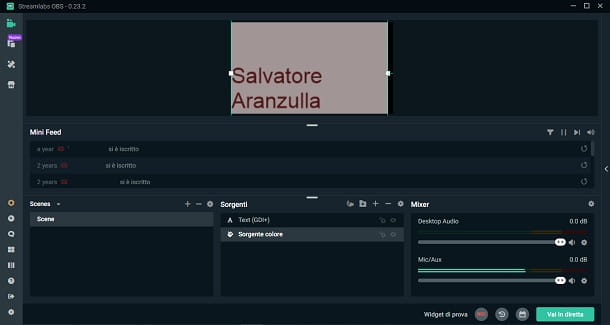
First, you need to create one scene to which to add the elements to be broadcast live: click on the symbol [+] placed in the box Scenes, assign a name to the scene, typing it in the text field displayed on the screen, and click on the button Done to save the scene.
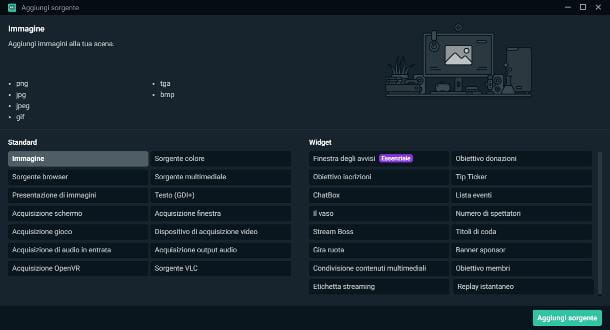
At this point, you need to select the sources of the scene, i.e. the video and audio "parts" that will be broadcast live: then click on the button [+] corresponding to the box Sources/Sources and, using the new window that appears on the screen, select the first element to add to the scene.
- Image – allows you to add a photo in PNG, JPG/JPEG, GIF, TGA or BMP format.
- Browser source – Insert a browser window.
- Presentation of images – allows you to add a sequence of photos to the video.
- Screen capture/game – allow you to broadcast, respectively, what happens on the desktop and within a game.
- Incoming audio capture – allows you to transmit the audio coming from the microphone.
- OpenVR acquisition – captures the video coming from a device dedicated to virtual reality.
- Color/multimedia source – add a background color or a media clip to the scene, respectively.
- Text – allows you to insert text into the scene.
- Window capture – allows the broadcast of a specific window opened on the desktop.
- Video capture device – adds content from the webcam to the scene.
- Audio output capture – allows you to transmit sounds coming from the computer.
- VLC source – allows you to insert a playlist of videos to the scene.
- widget – Widgets allow you to view stats and channel information (last subscriber, chat, current donations, number of viewers, etc.) within the scene. Each widget allows you to display a specific set of content, depending on the streaming network on which it is used.
Once you have selected the first element to add to the scene, click on the button Add source, indicates the name to assign to him, press up again Add source and specify, using the next screen, the settings relating to the chosen source (for example, the window to transmit, the background color to use, the text style to display, and so on).
After adding the source, position it on the scene in the way you deem most appropriate, using the box located at the top of the Streamlabs window; subsequently, proceed in the same way by adding all the sources necessary to compose the live scene you are about to create.
If necessary, you can change the settings of a given source at any time by right clicking on the source name and selecting the voice Property from the displayed context menu.
As you can see, by default, the Streamlabs window is divided into three areas: the first, the one at the top, which displays the selected scene; the second, which includes the feed of the latest events on the channel; and the third, which allows you to act on the scenes, video sources and audio mixer.
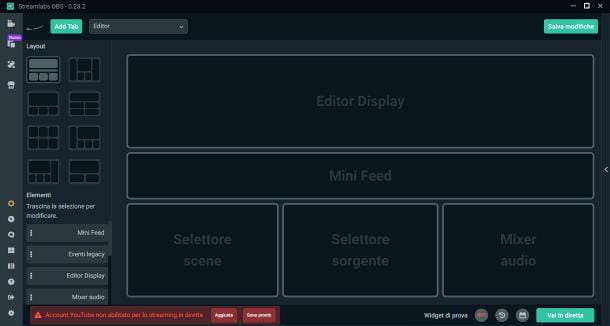
To change the display mode and modify the program interface as you prefer, click on the button Editor Layout placed in the left sidebar (depicting four panes) and arrange the layout as you see fit. When you're done, click the button Save Changes, to save it all.
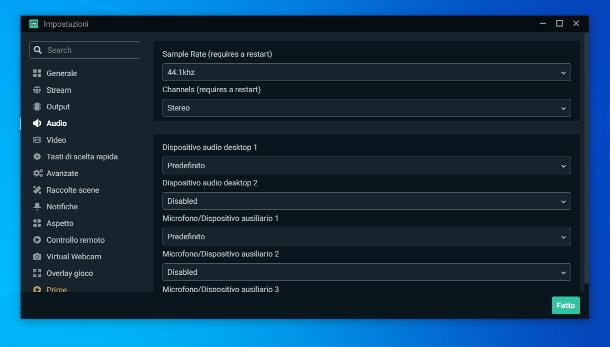
If you need to change the default settings of the program (for example, if you want setup Streamlabs audio for multiple devices), click on the symbol ofGear, located on the left sidebar of the software, to display the panel dedicated to them. Below, I will briefly list the options available in each section.
If, on the other hand, you intend to record the content on your computer, click on the button Rec (located at the bottom) to start capturing the video, which will automatically be saved in the folder Video of Windows.
How to set up Streamlabs on smartphones and tablets
Prefer to use Streamlabs to stream from smartphone or from tablets? Again setting up the app isn't difficult at all. However, as it is easy to imagine, the configurable elements in each scene are quite limited: in fact, in addition to the various widgets, only the screen or the camera content can be transmitted.
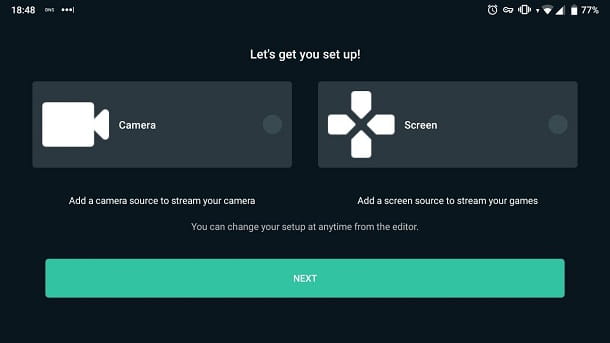
When logged in, you should see the Streamlabs splash screen, where you can choose whether to stream content from your camera (Camera), or whether to cast screen content (Screen). Once you've made your selection, press the button NEXT and choose i widget to add to the live, ticking the corresponding boxes.
When you're done, tap the button Done and, if prompted, press the button Enable Camera & Mic and respond yes to subsequent warning messages to allow Streamlabs access to your camera, microphone and screen capture.
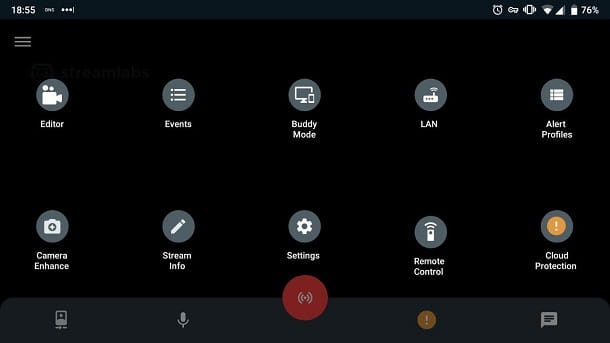
At this point, you can start with the actual configuration of the app: first of all, touch the ☰ icon located at the top left, in order to bring up the app's main menu, and touch the button Editor located in it, to display a preview of the current scene.
You can reposition/resize the elements present by "dragging" them by the edges, access the relative advanced settings by touching the button (🇧🇷), corresponding to each box, or add new ones by pressing the ☰ button located on the right and then the button capacitor positive (+) lead, located in the panel that appears. After all the changes, touch the button ✓, residing in the upper left.

To access the app's advanced settings, go to its main menu and tap the button Settings: In this way, you have the possibility to alter the behavior of Streamlabs during live broadcasts (and not only). Below are some of the available options.
In any case, once the Streamlabs app and the scene have been properly configured, you are ready to start the live broadcast on the platform you are connected to: to do so, all you have to do is press the icon broadcast (The red button with waves).
Remember that, at any time, you can change the camera in use (if you have chosen to use it in the scene), the microphone and the chat, using the lower bar of the Streamlabs app; if you don't see it, tap on the screen. Easy, right?


![[Solved] Android App Won't Open Problem](/images/posts/a150cb8db0eb50df4b79257485e3c04c-0.jpg)