You have moved into your new home, you have activated the Internet connection and, unfortunately for you, the bitter surprise has arrived: the modem/router you use to connect to the Internet is not able to offer adequate wireless coverage for all rooms, unfortunately losing the signal right where you placed your work computer and, even worse, your new Smart TV!
It is for this reason that you have found yourself choosing between two possibilities: the first is to replace the modem you currently have with a more powerful one, which can theoretically offer better coverage than the one you already have; the second possibility, decidedly cheaper, is to focus on a Wi-Fi repeater which, with a much lower cost, allows you to cover even the points of the house that are too far away and/or subject to interference that limit the range of action of the main modem.
How do you say? You have opted for the latter solution and now you are looking for a guide that will allow you to understand how to set up a WiFi repeater? Well, you've come to the right place: below, in fact, I intend to explain to you in detail how to best configure a device of this type, so as to obtain the desired increase in coverage and offer that degree of connectivity that can make you stay Calm. So, armed with patience and good will, make yourself comfortable and read what I have to explain to you on the subject: I'm sure the result will leave you amazed. Having said that, I can only wish you a good reading and a good job!
Index
Preliminary information: repeater types
The task of a Wi-Fi repeater is to enhance the wireless signal offered by the main router, so as to also allow computers, smartphones, tablets and other connected devices to be able to use the network connection, even if they are far from the router itself.
However, although the purpose is still the same, there are different categories of wireless repeaters, which differ according to the type of connection to the main router: here are the most commonly used ones.
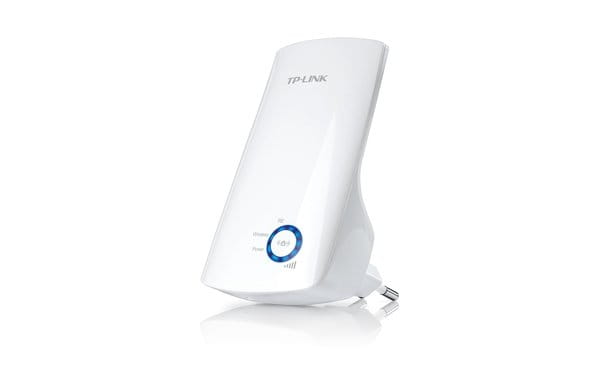
- range extender o simple repeater: it is a device, sometimes equipped with adjustable antennas, which connects to the router via Wi-Fi and generates an extended network, through which it is possible to access both the Internet and the local network. By default, the extended network has a slightly different name than the main one (which is preceded or followed by the word EXT) but shares the same password as the main one. It can come in various shapes and sizes (some are "boxes" that plug directly into the wall outlet, others are very similar to routers).
- Access point PoE o Powerline Wi-Fi: is a device which, in combination with a Powerline adapter connected to the router via network cable, it acquires data from the electricity network and distributes them via a dedicated Wi-Fi network. It is recommended to use one or more PoE access points in large environments, where it is not possible to place a simple repeater in an ideal way (eg because the area to be covered is extremely distant from the router). More info here.
- Satellite mesh: is a range extender that is part of a system made up of other satellites all connected to a main router (of the same brand). The satellites do not have a "hierarchy", therefore they communicate with each other to best expand the reach of a wireless network in order to maximize its performance in the area where it is needed by the user (creating a single large wireless network that allows to stay connected without interruption even when switching from one satellite to another).
If you are reading this guide for preventive purposes and are still undecided about which extender model to buy, do not hesitate any longer and take a look at my guide to the best Wi-Fi repeaters: I am absolutely certain that you will find what best suits your needs.
Note that unless you are dealing with mesh systems (where all devices must be part of the same product family), it is not essential to purchase PoE adapters or Wi-Fi repeaters of the same brand as the main router; however, before buying anything, always take care to check the degree of compatibility of the repeater of your interest, the supported Wi-Fi standard and the performance it is able to offer: in this, careful reading can be very useful comments and reviews left by users.
How to place a Wi-Fi repeater
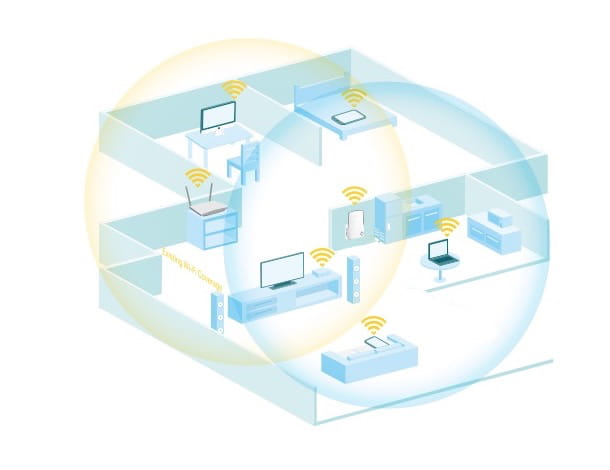
Wi-Fi repeaters mainly have the task of enhancing the signal of the wireless network managed by the main router, so as to also cover areas otherwise without coverage but, from the point of view of performance, the speed offered by a repeater of this type depends mainly from its position: the closer the original signal of the modem/router is and without interference, the better the quality of the signal generated by the extender will be, the better the performance of the devices connected to it will be.
In very simple words, by connecting a Wi-Fi repeater (even mesh) in an area where the original router has a weak signal, the browsing speed achieved by the devices connected to the extender will not be exciting, despite the repeater offering its full signal (this happens because the original signal is not strong enough to be replicated without further losses).
Instead, strategically placing the extender where the signal from the original router is just starting to lose strength (for example, when it "picks up" 3 or 4 out of 5 bars), coverage is effectively extended, maintaining performance of approximately 70-80% of the original maximum network transmission rate. By doing so, network coverage can be guaranteed even in those points where the router fails to do its duty.
However, the story is different for adapters Wi-Fi type powerline (or PoE): the latter does not necessarily have to be within the range of the router, as it takes the Internet signal directly from the socket; however, the PoE adapter must necessarily target the same lifesaver that manages the Powerline adapter connected to the main routerotherwise there will be no data exchange.
Regardless of the type of device you have, always take care to position it in one place without physical borders (e.g. in a piece of furniture or placed on a recessed shelf), far from metal objects or other radio wave devices but, above all, well ventilated: Wi-Fi repeaters, especially if they are Powerlines equipped with loops, tend to heat up even considerably and, therefore, it would be appropriate to keep them positioned where the transit of air can favor their cooling.
Particular attention should also be paid to the orientation of the external antennas, when they are present and not fixed: Ideally, the endings should be positioned so that they form one V, Or a L inclined; orienting them both in the same direction, on the other hand, does not improve the transmitted signal in any way.
Again, avoid them antenna ends form an X or that, even worse, the respective tips touch each other: this would cause a considerable disturbance of the signal, negatively affecting the quality of the transmitted signal.
How to set up a wifi repeater
Once you have chosen the Wi-Fi repeater of your interest, all you have to do is place it, to turn it on and complete the simple initial setup procedure, following which the machine will be able to extend the range of the main wireless (or wired) network.
To succeed in the enterprise, you can proceed in three different ways, depending on your needs and the devices at your disposal: via browser, making use of theofficial app made available by the manufacturer of the network device or using the WPS technology.
Although the latter technique is the simplest and fastest (just press the WPS physical button first on the router and then on the range extender, so as to automatically create the extended network with the same password as the main one), I always tend to advise against it, since it is extremely insecure and has been affected over time by numerous security flaws .
That said, to configure a Wi-Fi repeater via browser or smartphone/tablet application, arm yourself with a computer, smartphone or tablet equipped with a Wi-Fi card and connect to the temporary wireless network generated by the repeater; the name of the latter is almost always reported on thestickers affixed to the Wi-Fi repeater (sometimes in the form of a QR code). Provisional wireless repeater networks are generally not password protected; otherwise, the latter is also specified on the adhesive label above.
Once the connection is established, if you intend to continue with the browser, launch the latter and enter theIP address of the repeater in the appropriate navigation bar; the latter information is generally reported on thestickers glued to the Wi-Fi repeater. However, if you don't find it, you can obtain it completely independently, following the same steps that you find explained in my guide on how to find the router's IP (the procedures are practically the same).
At this point, come on Submit and, if prompted, set one new password to use to protect the range extender administrative areaby inserting it in the proposed form; then, press the button to proceed with the initial configuration of the device (usually named Configuration Wizard, quicksetup, Wizard or similar) and, if requested, indicate that you want to configure the device as range extender o access point/AP Wireless.
That done, go NEXT, select the rete Wi-Fi a 2.4 GHz to be extended among those available and, after indicating the one you are interested in, enter it Password in the appropriate field and give confirmation pressing on the necessary button; if necessary, repeat the same operation also for the 5 GHz Wi-Fi network. Clearly, these last steps are not necessary if you are configuring a PoE repeater. At this point, all you have to do is complete the configuration, following the most suitable procedure based on the device you are using.
- Simple repeater: examine the summary page that is offered to you, to locate the extended network name that will be generated by the extender (the latter almost always corresponds to the name of the main network, preceded or followed by the word EXT) and the warning regarding the complete match between the main network key and that of the extended network; in a nutshell, both networks will have the same password. In some cases, you may be able to change these last two settings if you wish.
- Powerline: fill in the screen that is proposed to you by entering the name of the wireless network to be created, the Password to use to access it and the frequency band to use (2.4 GHz, 5 GHz, or both).
- Mesh Repeater: no additional configuration should be required, as the device "inherits" the settings directly from the router.
In any case, once you have checked (and possibly defined) the network settings, all you have to do is confirm the desire to make them definitive, by pressing the dedicated button: following this operation, the the repeater's temporary network should turn off and, at the same time, the device should perform a restart, after which it will be possible to use the extended network (or the mesh one) configured just before, like any other Wi-Fi connection.
Steps to set up a wireless repeater using theofficial app provided by the manufacturer are similar to those seen just now: in this case, however, you have to download theapp from the store on your device even before connecting to the repeater's temporary Wi-Fi network, and then starting it with the connection established. Typically, the app can detect the extender that needs to be configured by itself and, therefore, you will not need to specify its IP address.
How to configure Tenda WiFi repeater
If you have a wireless repeater Tenda, after turning it on and connecting to the temporary wireless network managed by it, type the URL Tendawifi.com in the address bar of the browser and from Submit. After a few moments, you should find yourself face to face with the administrative panel of the device: press on the item Wireless Repeat placed to the side, choose whether you want to use the mode Repeater universale selecting the appropriate box and wait a few moments for the list of available wireless networks to appear on the screen.
At this point, put the check mark next to the name of the Wi-Fi network to expand, enter the network key corresponding to it and take note of the Wi-Fi base station namewhich is the one set by the repeater for the extended network. Finally, press the button OK twice consecutively, in order to restart the device and make the extended network operational.
How to set up a Netgear WiFi repeater
As for branded repeaters Netgear, the steps to take are as follows: connected to WIFI network managed by the device (usually named NETGEAR_EXT), open your browser and type the address www.mywifi.ext in the URL bar.
Now, come on Submit and log in to the repeater's administrative area, entering your credentials admin e Password in the appropriate fields and then pressing the button Login. Now, choose the Wi-Fi network to extend from those available, press the button Continue, enter the network key corresponding to it and press the button again Continue.
At this point, type the name of the extended 2.4 GHz network and the 5 GHz one in the appropriate fields and put a check mark next to the item Use the same security mode and password as those for the existing network, to ensure that the access key to the extended network coincides with the one in use on the main network. Otherwise, leave the aforementioned box unchecked and type the network key to be used for extended networks in the dedicated field.
We're almost there: press the button now Continue, check the accuracy of the defined settings (and check that there are no messages relating to low Wi-Fi signal strength) and, when you're ready, press the button again Continue: the repeater should now restart and create the extended network, following the parameters specified above. More info here.
Note: the same procedure can be started using the app NETGEAR Nighthawk, available for Android devices (also on alternative stores), iPhone and iPad.
How to setup JOOWIN WiFi repeater
Have you purchased a JOOWIN repeater? Then proceed as follows. To get started, connect to the wireless network managed by your device (e.g. JOOWIN-XXX-2G oppure JOOWIN-XXX_5G), open the browser and type the IP address 192.168.10.1 in the dedicated navigation bar.
After that, enter your password admin, award-winning Login/Set password and wait for the device to detect the available wireless networks; now, press on name of the Wi-Fi network to be extended and, if you want the devices connected to the extended network to switch automatically from the 2.4 GHz network to the 5 GHz one and vice versa (depending on the available services), move to ON the corresponding levetta alla voce combine wifi. At this point, if you want the extended network to have the same name as the main one, also activate the named switch Sync your device.
Regardless of the choices you made, now type the Password of the main network key in the dedicated field, press the button Save changes and wait a few minutes for the repeater to restart and make the extended wireless network available (which, in any case, will have the same access key as the main one).
How to set up TP-Link WiFi repeater
If you own a branded repeater TP-Link, connect to the temporary wireless network generated by it, type the address 192.168.0.254 in the browser URL bar and give Submit. Alternatively, download and install the application TP Link Tether from the Google Play Store (it is also available on some alternative stores for Android) or from the iPhone and iPad App Store, connect the device to the temporary network generated by the repeater, start the app and touch the name of the repeater to be configured.
The procedures, starting from this moment, coincide: press on the wording Mode/Change Mode, check the box next to the entry range Extender, award-winning Save and launch the initial setup wizard, opening the tab Quick setup.
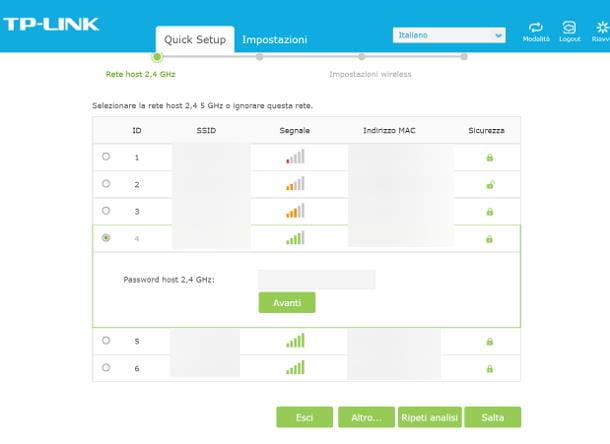
Now, wait a while for the router to locate the les reti a 2.4 GHz available, select the one you are interested in and enter the network key to be used to access it, in the dedicated field; once this is done, press the button NEXT and, if necessary, repeat the same operations for the 5 GHz network.
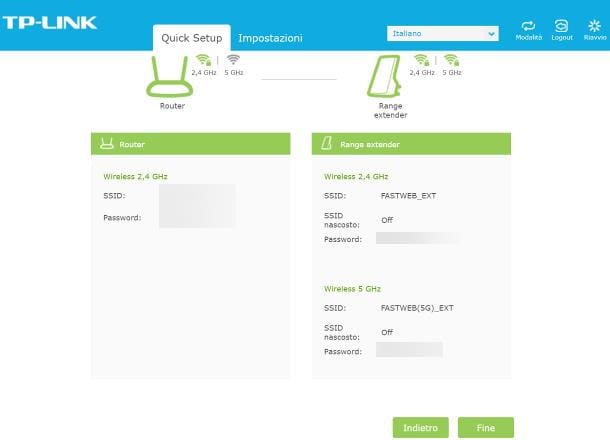
At this point, if you wish, type the custom name to be used for extended 5 GHz and/or 2.4 GHz networks in the dedicated fields (otherwise leave the default one unchanged), go forward and check the parameters inside the boxes Router e range Extender which represent, respectively, the information relating to the original network and that relating to the extended network.
To complete the configuration and make the extended network operational, press the button end and wait patiently for the repeater to restart; For more details, check out my guide on setting up a TP-Link extender.


![[Solved] Android App Won't Open Problem](/images/posts/a150cb8db0eb50df4b79257485e3c04c-0.jpg)