Someone told you about the possibility of connecting to your computer via the Internet exactly as you would via a local network: while researching around, you came across my tutorial on how VPNs work, and now you're going to set up your own VPN to connect to the your PC using the "tunnel" mechanism.
I must admit that you made an excellent choice, also considering the practicality of this system: sure, understand how to create a vpn it is not immediate, but I can guarantee you that by following all the advice and tips that I will provide you in this guide, it will seem so simple that you will be able to master everything in a flash and set up a brand new VPN on both Windows and Linux!
Before continuing, however, I must make a premise: "home" operating systems, such as Windows 10, Windows 8.1 or Windows 7, allow the creation of VPNs using only the PPTP protocol, currently considered obsolete due to some vulnerabilities ( however difficult to exploit) encountered in the past. Consequently, I advise you to connect to your VPN only in conditions of security, to avoid unpleasant surprises.
Index
Preliminary operation
The operation of creating a VPN, in itself, is really simple: all you have to do is make a couple of clicks or issue a few commands from the Terminal. What can take some time, however, is the process of getting your computer and network ready to host a VPN.
In most cases, Internet service providers assign their customers a dynamic IP address, i.e. an IP that changes every time the modem disconnects and reconnects to the Internet: this could be a "problem", since it is not possible to know in advance the next assigned dynamic IP. Consequently, in case you want to connect to your homemade VPN, you need to obtain the IP address of your router beforehand, which however could change at any time.
Once all required fields have been filled in, uncheck the box Send me newsletters & special offers, pigia sul pulsating Free Sign Up and click on the button Confirm address present in the confirmation email that is automatically sent to your email inbox.
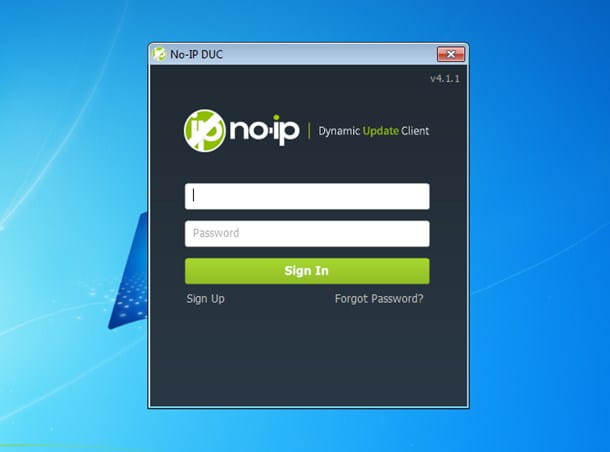
Once registered with the service, you need to download the program that allows you to "associate" your IP address with the chosen hostname: to do so, connect to this web page, press the button Download Ora and wait for the file to download to your computer.
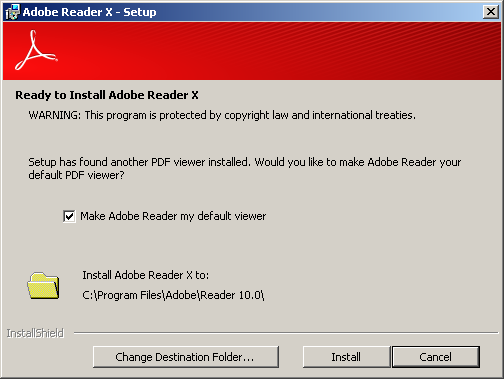
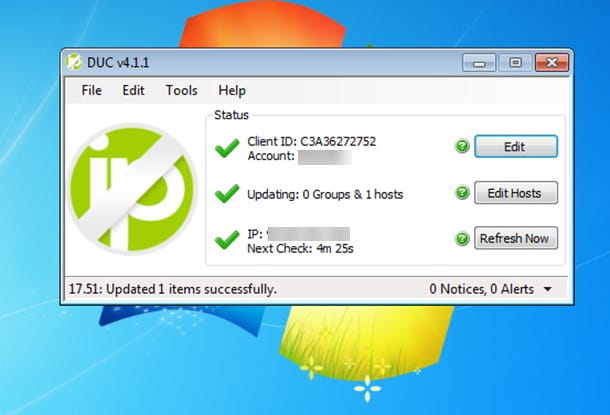
These poisons are Windows, start the aforementioned file, then press the buttons I Agree, Install e Finish, enter yours on the program screen username and yours Password and click on the button Sign In. If necessary, put the check mark in the box relating to the newly created hostname, located inside the new panel, click on the button Save and wait for the three green check marks to appear in the main program window. If you want, you can minimize the program by pressing on X located at the top right.
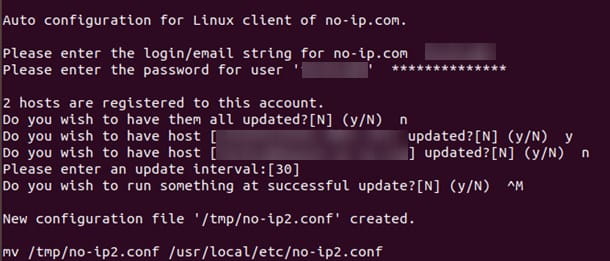
If, on the other hand, you intend to configure your VPN on Linux, you will have to act almost entirely from the command line. Open the terminal recalling it from main menu of your distribution or from Activity view, type the command cd ~/Downloaded I awarded Submit, repeat the operation for the commands tar -xfvz noip-duc-linux.tar.gz and then type cd noip-2.1.9-1/, then type the command sudo apt install make gcc, Followed by Submit.
Once this is done, start the compilation and configuration procedure by issuing the command make && sudo make install: When prompted, type the Linux administrative password and presses Submit, then type theEmail login to no-ip always followed by Submit, then type the relative Password and presses five times Enter, until the text appears mv /tmp/no-ip2.conf /usr/local/etc/no-ip2.conf.
Although the previous operation only needs to be performed once, you have to manually start the no-ip client every time you intend to use your VPN: you can do it very easily, again from the terminal, by typing the command sudo noip2 followed by Submit.
Assign a static local IP
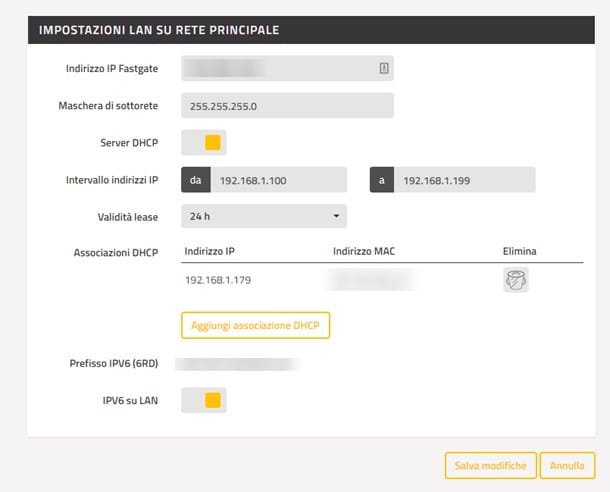
Once the hostname is associated with the IP address, there is a need to assign a local IP address static to the computer you intend to create your VPN on. The easiest way to do this is through the router: generally speaking, what you need to do is first connect the computer to the network, then enter the router, access the section LAN settings o devices, select the option for Address reservation or atadded DHCP association (alternatively, you can put a check mark on the item relating to the assignment of a fixed IP), type the address to be assigned to the computer (eg. 192.168.1.25) and save the changes.
Unfortunately I can't be more specific about assigning static IP addresses, as each router has slightly different options. In principle, however, you should be able to achieve this using the instructions that I have already provided: in the unfortunate case you do not succeed, I advise you to refer to my guide on how to assign static IP to obtain further information on the matter.
Open the NAT in the router
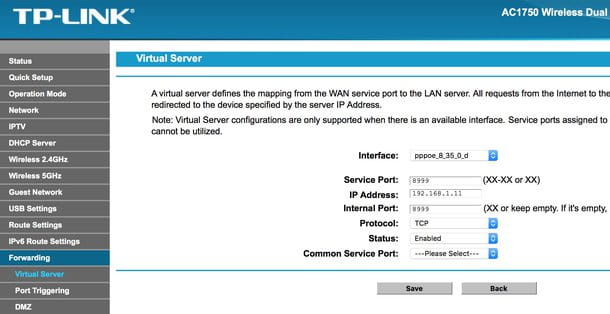
The last operation to be performed, before moving on to the actual configuration of the VPN on the computer, is to open the NAT in the routeri.e. to make the listening ports associated with the VPN service accessible from the outside.
To do this, access your router (you can follow my dedicated guide to find out how to proceed), go to the section port Forwarding o Virtual Server, insert where required thelocal IP address of the server (the static local IP address of the computer that you set in the previous section), the door to open and protocol. As for the VPN, you have to open the doors 47 e 1723 with protocols TCP e UDP.
If the instructions I gave you weren't enough and you couldn't find the section that allows you to open ports on your router, I invite you to consult my guide on how to open NAT to get the exact sequence of steps to be applied to achieve the goal.
How to create a VPN on Windows
Now that you've finally got everything in place, it's time to get in on the action and create a VPN on Windows. As I already mentioned to you, the will be used PPTP protocol: Although its vulnerabilities are not easy to exploit, I remind you once again that it is quite a protocol obsolete, therefore I advise you to use the VPN thus created aware of the possible risks. Also keep in mind that a VPN server created in this way can accept at most one customer at a time.
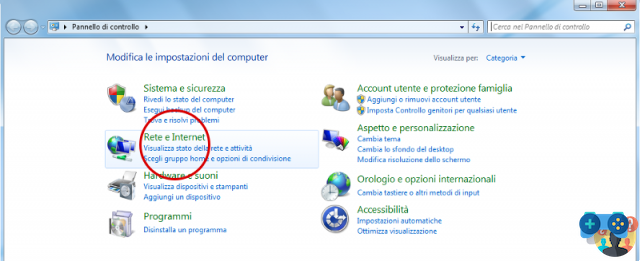
Having made these premises, it's time to take action: start the Control Panel looking for it in the menu Home (Accessibile proceeds il pulsado a forma di pennant located in the lower left corner of the screen), click on the item Rete and Internet, then on the voice network and sharing center and, from the left side of the window, select the item again Modify impostazioni scheda.
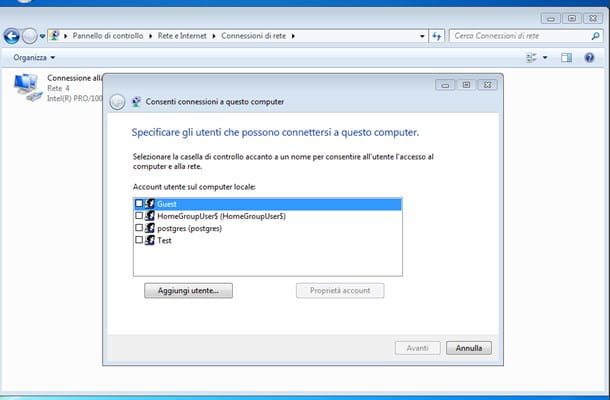
Once this is done, press the button Alt of the keyboard to display the menu bar, select the menu File > New Incoming Connection…, select the computer users authorized to access it, placing a check mark on the corresponding boxes, and presses the button NEXT. If necessary, you can create new ones by pressing the button Add user… and filling in the proposed form.
In the next panel, put a check in the box Internet process, click here NEXT, tick the boxes Internet Protocol Version 4, File and printer sharing for Microsoft networks e QoS packet scheduler, then select the item Internet Protocol version 4 e pulsing sul pulsating Property.
At this point, put the check mark on the box Specify IP addresses and enter the starting IP address and the final IP address to be assigned to the devices that will connect to the VPN in the appropriate fields. For example, if you intend to reserve more than 50 IP addresses (well aware of the fact that, as I explained earlier, you will only be able to use two at the same time), you can use 192.168.1.150 as the starting address e 192.168.1.199 as the final IP address.
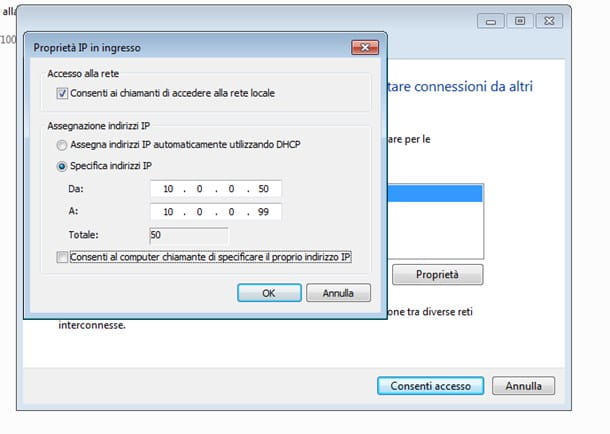
Now, click the button OK and, once back in the main window, on the button Allow access. Then wait for the VPN creation message and click on the button Close.
You can check the number of devices connected to your VPN using the icon Incoming connectionsalso located in Control Panel > Network and Internet > Network and Connection Sharing Center > Change adapter settings. To delete the VPN, however, right click on the icon Incoming connections, select the voice Delete from the proposed menu and presses the button Yes.
How to create a VPN on Linux
Also regarding Linux, the procedure I'm about to walk you through is to create a protocol-based VPN PPTP: I want to remind you, once again, that this is a fairly old protocol. although not very easy to break.
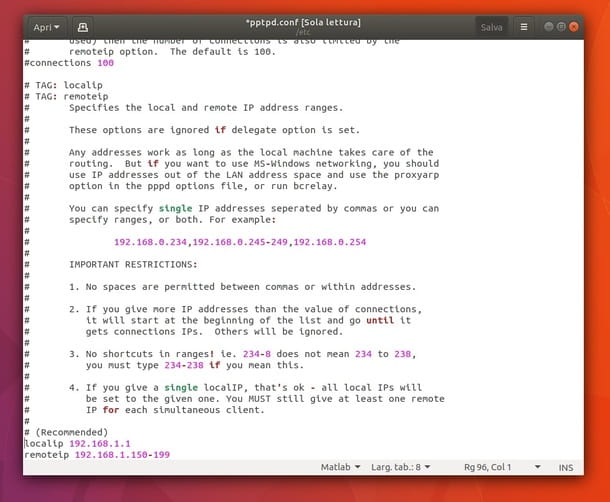
Once the process is complete, what you need to do is declare to the VPN server the IP address of the computer (the one you will connect to) and the IP address space to be assigned to the "guest" devices. To proceed, type the command from the terminal sudo gedit /etc/pptpd.conf, scroll to the end of the text, go to the top by pressing Enter and insert the following in the file.
localip 192.168.1.25
remoteip 192.168.1.150-199
Of course, you need to substitute the IP address for localip what you assigned to the computer acting as the VPN server, and to the set of addresses corresponding to remoteip the ones your computer has to assign to the VPN “guests”. Once the changes are complete, press the button Save located at the top right and close Gedit.
At this point, you need to tell the VPN server which address to use to "convert" literal addresses into IPs (usually the router takes care of this task): to proceed, again from the terminal, type the command sudo gedit /etc/ppp/pptpd-options followed by Enter, enter the administrative password if required, go to the bottom of the file, go to the line header by pressing the key Submit and type the following.
nobsdcomp
noipx
1490 people
mru 1490
The last necessary step is to configure the user who can access the VPN, "declaring" the username and password to be dedicated to it: to proceed, type the command from the terminal sudo gedit /etc/ppp/chap-secrets followed by Submit and type, if necessary, your administrative password.
Make sure you are alone (as passwords are shown in clear text), then type the username to access the VPN, press the button TAB on your keyboard (the one usually located on the Shift key), enter a * (asterisk), press the key again TAB, type the Password, press the button again TAB and enter another *. Once this procedure is complete, press the button Save, close gedit, type the command from the terminal sudo systemctl pptpd restart and finally the command sudo sysctl -p: Your VPN is finally ready! You can turn it off at any time by typing the command sudo systemctl pptpd stop.
How to connect to a VPN
It's time to enjoy the result of so much effort and connect to the VPN you just created! Don't worry, the procedure is absolutely simple: all you need to have at hand to connect is thehostname of your server (the one created through the service no-ip), the username and Password to access the VPN. Once the information has been recorded, you can connect to your computer using one of the procedures that I indicate below.
- Windows 10 – access the notification area by clicking on the button in the shape of comic located at the bottom right, press the switch VPN and then on the voice Add VPN connection located in the new panel that appears on the screen. Select the entry Windows give menu to tendin Provider VPN, type the name of the connection in the appropriate field, enter thehostname of your server in the field Server name or address, select the voice PPTP (Point to Point Tunneling Protocol) give menu to tendin VPN type, scegli l'opzione Username and password from the menu Login info type and finally, type the VPN access credentials in the appropriate fields and press the button Save. Once back in the panel Settings, click on the newly created VPN icon and then on the button Connect.
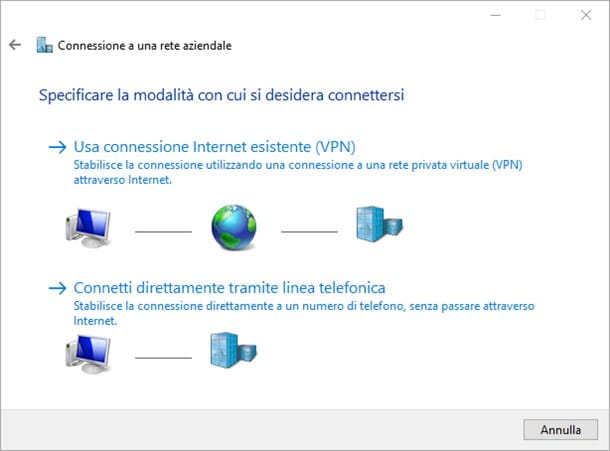
- Windows 7, 8.1 – Open the Control Panel from the menu Home, click on the items Network and Internet, Network and Sharing Center e Set up a new connection or network. From the panel that opens, select the item Connecting to a corporate networkthen click on the item Use existing internet connection (VPN), enter in the field Web address lo hostname of your server, press the button NEXT, type the username and password where required and then press the button Connect.
- MacOS – the system preferences manager, for security reasons, does not support connectivity via the PPTP protocol. If you still want to do that, you can avail a third-party program, such Shimo: connect to its main Internet page to download it, run the setup file, drag the Shimo icon into the folder Applications of your macOS and open the program from the aforementioned folder, right-clicking on its icon, selecting the item apri from the proposed panel and clicking again on the button apri. At this point, click on the new icon that appears in the system panel, select the item Preferences from the proposed menu, after which click on the button Showcase placed at the top, then on the button capacitor positive (+) lead located at the bottom, set the check mark in the box PPTP / L2TP, click here Create, enter the hostname, username and password of your VPN server where required and press the button again Create. You can connect and disconnect from the VPN using the icon in the system panel.
- Android – click on the icon Settings placed in the app list of your device, then on the entry Other present in the box Wireless and networks and finally on the option VPN. At this point, touch the button capacitor positive (+) lead located at the top right, type a name for your connection, select the entry PPTP give menu to tendin Type and type in the field Server address the hostname of your VPN. If needed, you may be asked to set up an unlock PIN, password, fingerprint, or pattern for credential storage. You can connect simply by tapping the name of your VPN and typing, when requested, the access credentials; you can stop connecting to the VPN using the system notification area.
- iOS – unfortunately, as already seen for macOS, the iPhone and iPad operating systems no longer have support for configuring VPNs with the PPTP protocol, due to the obsolescence of the latter: consequently, it is not possible to connect to such a VPNs.
Best VPNs
If you've made it this far, I'm sure you've mastered everything about setting up a VPN. Wait, are you telling me that you find everything too complex and that, as an alternative, have you thought about relying on an "external" VPN service? Then I suggest you try the ones given below.
NordVPN
The first service I want to tell you about is NordVPN. Thanks to its advanced encryption system, which hides the activities related to online browsing from those who are outside (be it the Internet provider, a potential attacker or the NordVPN managers themselves, who do not record anything done by users) and its ease of use, NordVPN is one of the most used VPN services in the world.
It can count on a wide range of servers located in various corners of the globe and is available on all the most popular hardware and software platforms. The many servers available, some of which are dedicated to the exchange of files on networks P2P (e.g. BitTorrent) and web surfing Tor (Onion protocol), allow you to overcome the regional restrictions of all countries and to access the foreign catalogs of streaming services. There are even some that can provide a static IP.
Another point in favor of NordVPN is its compatibility with all major hardware and software platforms: NordVPN is in fact available on computer (Windows, MacOS e Linux), mobile devices (Android e iPhone/iPad), Smart TV Android TV, NAS, Raspberry Pi, router and more.
As for prices, the service offers different plans: the cheapest one allows you to use NordVPN for 2 or 3 years based on current promos less than 3 euros/month (billed annually); alternatively you can use the service for 2 years at 2,97 euros/month (billed annually), per 1 year at 3,93 euros/month (billed annually) or per 1 month at 9,56 euros. In promotional periods, the price may also include extras (e.g. the password manager North Pass, valued at $194.61). It should be noted that all plans allow you to use NordVPN on up to 6 devices simultaneously and come with a 30-day money-back guarantee.
Having said that, let's move on to action. To start using NordVPN, connect to the official website of the service, choose the plan to subscribe to and create your account by following the instructions on the screen (the accepted payment methods are the most diverse: card, PayPal, Apple Pay, Google Pay, Cryptocurrencies , Alipay etc.).
Once registered and logged in, if you want to use NordVPN on your PC, download the official client of the service and install it. On Windows, so open the .exe file che hai ottenuto, click on the button Yes, wait for all the files necessary for the correct functioning of the program to be downloaded from the Internet and click on NEXT, install e Finish. On MacInstead, go directly to the Mac App Store.
To install NordVPN on a smartphone or tablet, the procedure is even easier: open the store of your device (e.g. Play Store on Android or App Store on iPhone/iPad), search for NordVPN within the latter and first tap on theicona dell'applicazione (in the search results) and then on the button Installa / Ottieni. On iPhone/iPad, you may be asked to verify your identity using Face ID, Touch ID or Apple ID password.
Now you just have to start NordVPN on your favorite device, do the Log In with your account details and select the VPN server to connect to: you can choose one nationality, a Speciality server (i.e. one of the servers optimized for P2P, browsing by protocol Onion or with navigation via Dedicated IP) or you can take advantage of the function of search, to find a VPN server quickly.
Once the connection is established, you can use your favorite programs as normal to browse online, enjoying the protection of NordVPN. At the end of the session, to disconnect from the VPN, open NordVPN and click on the button Disconnect. For more info, read my NordVPN review – I'm sure it will come in handy.
Surfshark
Surfshark is another VPN service that manages to combine security, ease of use and flexibility at extremely low prices. Thanks to its advanced 256-bit encryption and the many servers it offers (disseminated in every corner of the world), Surfshark allows you to surf without limits while protecting your identity and maximizing your privacy.
This means that neither bad actors nor ISPs, nor even the Surfshark operators themselves, will be able to monitor your online activities. You can also effectively protect yourself against public Wi-Fi hacking, phishing (with the cleanweb, which allows you to protect yourself from malware, phishing and other harmful / annoying content on the Internet) and you can both bypass censorship and regional restrictions, for example by accessing foreign catalogs of streaming services. You can even create a list of programs and sites that shouldn't use the VPN (feature whitelisting) and set a Kill Switch to automatically disable your internet connection when you disconnect from the VPN.
The prices are extremely low: the cheapest plan is that of 36 months which costs 1,69 euros/month (billed every 36 months); alternatively there are the top from 12 months which costs 3,49 euros/month (billed annually) and the plan from 1 month which costs 9,89 euros.
To start using Surfshark on your PC, all you have to do is visit the official website of the service and click on the button Buy it now. Then choose the piano you prefer and provide us with a valid payment method between credit card, PayPal, Google Pay, Amazon Pay, Cryptocurrency etc. then completing the transaction using the instructions on the screen.
Once the service is activated, all you have to do is install the Surfshark client for Windows or macOS and/or the Surfshark apps for Android or iOS/iPadOS and press the button to start the free trial or enter i login data to log in with your account.
The game is done! To protect your connection, all you have to do is start Surfshark on the device of your interest and press the button Connect, to connect to the fastest and/or closest VPN server. Alternatively, go to the section Positions and choose one of the many available servers (based on geographical location or characteristics, e.g. Static IP).
Within seconds, your connection will be protected and you will be able to surf securely and anonymously online. More info here.
More VPNs
In addition to the solutions mentioned above, there are other VPNs that I recommend you consider, all cheap but with high compatibility with all major devices and operating systems and with a high level of security and performance: Atlas VPN (of which you can find my review here), Express VPN e Private VPN. Check them out and you won't regret it!
Article created in collaboration with NordVPN.


![[Solved] Android App Won't Open Problem](/images/posts/a150cb8db0eb50df4b79257485e3c04c-0.jpg)