Here's how to configure and manage an excellent and free product to watch all movies on PlayStation 3 both from PC and streamed from the internet.
Introduction
PS3 Media Server is a Media Server Upnp compatible with the DLNA protocol for PlayStation 3, written in Java, with the peculiar characteristic of displaying on the console any type of multimedia file present on a Personal Computer via streaming or transcoding and with minimal configuration. It is already set up with the most popular Mplayer / FFmpeg packages.
A Personal Computer, a network card and an ADSL modem or alternatively a ADSL Modem / Router which incorporates both and one PlayStation 3 connected to the Personal Computer via the network card or the Modem / Router (Wifi or cable).
The product is Open Source and is present at this address.
Features:
* Ready to perform and broadcast. It does not require the installation of coding packages. It does not require the configuration of folders and any settings to enable other functions from the PC. All PC folders are directly shared via the program to the PS3 using a very simple interface and are updated in real time.
* Transcoding in real time via MEncoder
* Transcoding of VIDEO_TS folders and DVD ISO images
* Audio transcoding of OGG / FLAC / MPC / APE formats
* Generation of icons for Movies
* Possibility to choose the choice of speech and / or subtitles by means of an easy indication (virtual folder on the screen on XMB).
* All PS3 native formats are supported: MP3 / JPG / PNG / GIF / TIFF, as well as all kinds of movies (AVI, MP4, TS, M2TS, MPEG)
* Icon depicting the camera directly on the screen (Canon / Nikon, etc.)
* Ability to read ZIP / RAR compressed files as folders
* Support for images published on the web such as Flickr and Picasaweb
* Support for Internet TV / Web Radio via VLC, MEncoder or MPlayer
* Support for viewing published audio / video data in Podcasts (YouTube)
* Basic support for Xbox360
Windows / Linux:
* Direct streaming of DTS / DTS-HD data
* Remux PS3 compatible of H264 / MPEG2 movies and all AC3 / DTS / LPCM audio tracks in real time with TsMuxer
* Support FLAC 96kHz / 24bits / 5.1
Windows only:
* Remux of DVR-MS
Now let's see the steps necessary for the installation and first use of PS3 MEDIA SERVER.
Installation and first use
The first step is certainly to download from the official website of the project PS3 MEDIA SERVER the installation package.
So at this address you can find the latest versions of the product for Windows, Linux and Mac.
This guide covers the Windows version.
Once the installation package has been downloaded, with a double click we perform the installation very simple and straightforward.
Once installed, the product creates an icon on your desktop representing a green arrow while all its package of installed files resides in the canonical Program Files PS3 MEDIA SERVER folder.
This path will come in handy later.
At the first run you can select the main language of the menu even if some items (perhaps due to the continuous evolution of the versions) are in English.
From here we move on to the various sections of the program configuration and management window.
In addition to the Status section (status connected or disconnected from PS3) and Traces (tracing of activities), there is the General Configuration section in which you can enable your choice, for example, the multimedia library. This function allows you to show on the XMB the multimedia content present and / or connected to the PC with reference icons.
Even for the music, the program searches for the icon depicting the artist's album.
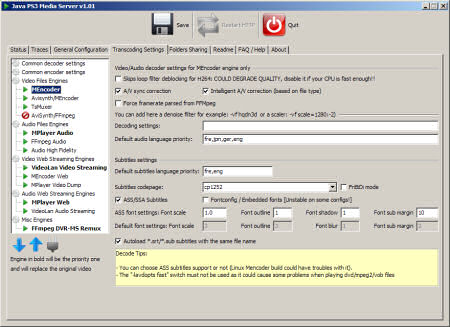
The section Transcoding Settings is the one that decides which and how to use between MEncoder / TsMuxer / FFmpeg for real-time encoding from PC to PS3 of non-directly legible movies including the MKV.
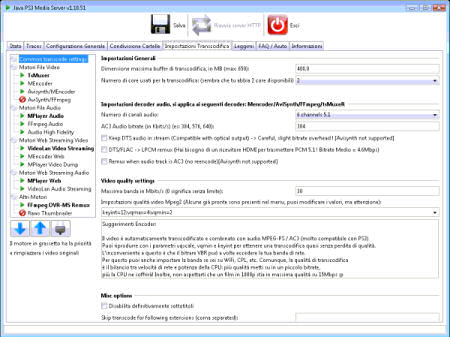
TsMuxer is the recommended one as it reads MKV audio and video tracks separately and simply merges them to make them visible without any effort and intervention from the PC CPU. The only limitation is that the MKV has both video and audio tracks compatible with PS3. In fact, the video must not be with a profile higher than MP HIGH LEVEL 4.1 and the audio in AC3. Otherwise TSmuxeR tries to make the tracks compatible, and in rare cases it succeeds.
On the contrary, MEncoder transforms the MKV into an MPEG2 data stream in real time, obviously occupying the CPU and also the data stream, passing from the already sufficient 10-12MBits to 20-24, which involves some image blocks.
In addition MEncoder allows the use of subtitles. To set the priority of subtitles, always on the PS3 MEDIA SERVER screen in the Transcoding Settings section, by selecting MEncoder from the Video Files Engine, the various functions are shown on the screen, including subtitles with a field alongside with the 3 letters relating to the language. . Example from is going to French. To set multiple preferred languages, a simple comma is used as a demarcation.
The default settings are almost always good but sometimes you have to intervene to adapt the program to your configuration and bandwidth limitation.
As mentioned, the XMB shows the files read by the program and resident on the PC or on a disk drive, even external connected to the PC.
By default the transcoding engine is MEncoder. To set TsMuxeR when selecting a file from XMB, you need to change the preference list on the program.
From section Transcoding setting, on the left there are various items. Select TsMuxeR which is located within Video Files Engine. Click at the bottom of the blue arrow showing the upward direction.
In this way TsMuxeR increases in position becoming the first of the Video Files Engine list.
From XMB to manually select the video transcoding engine is very simple. Just select the folder # –TRANSCODE– # which shows the same content first on the screen but with the type of video engine for transcoding available next to each file.
The contents must be selected from the XMB to the reference category. For example, a movie must be selected from XMB -> Video -> PS3 Media Server -> Web or folder -> movie. While a radio is playing from XMB -> Music -> PS3 Media Server -> Web -> Radios -> radio
Audio and Video from the Internet
A noteworthy peculiarity is the possibility of exploiting the various video and audio channels in streaming or podcasts on the internet via PS3 Media Server.
A practical example is streaming in a channel usually visible with Windows Media Player (http and / or mms data stream) or Real Player (rtsp data flow) not usable directly from PS3.
To do this, you need to manually edit a text file located in the folder where the program is installed on the Personal Computer.
Normally the path is C: ProgramsPS3 MEDIA SERVER.
To access it quickly, right click on the PS3 Media Server icon on the desktop and select 'Properties'.
In the window that appears, just click on the 'Open file path' button.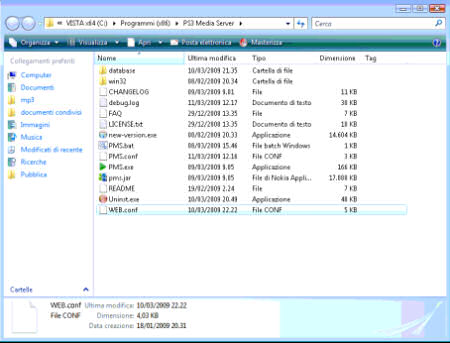
Here is the file WEB.conf. To open the file, use the traditional NOTEPAD (notepad).
The file consists of several parts.
What matters is the part it has as a header #internet tv.
For study purposes only, we tried to create and use one of those links that can be found on the network of TV channels such as News, Music, Film, Sport.
To create a new link usable from the PS3 XMB, you need to enter the following command line:
videostream.Web, TVs =TV CHANNEL NAME,URL ADDRESS OF THE VIDEO DATA STREAM,URL ADDRESS OF THE ICON IMAGE
To give it a try, we used the connection link a ITV4, English channel that generally broadcasts sports:
videostream.Web, TVs =ITV4,mms://itvbrdbnd-itv4.wm.llnwd.net/itvbrdbnd_itv4?e=1236419373&h=f509e0a5853e48cc%20a0123df3553643c9,http://www.tovo.co.uk/slideshow/albums/tv/itv4.jpg
On XMB it is easy to use as these items are contained in the folder on the screen WEB -> TVs.
The test gave a clear result of macroblocking of the image due to the low bitrate of the video transmitted by the network, not attributable either to the software or to the network connection.
In any case, the vision was sufficient and acceptable and in any case much better than the PC.
With the same concept with which we created a new video streaming link, you can do the same with
* images published on feeds such as Flikr and Picasaweb by inserting under the heading #images feed the string:
imagefeed.Web, Pictures =URL ADDRESS OF THE RSS FEED
* podcast radios by entering under the heading #shoutcasts the string:
audiostream.Web, Radios =RADIO CHANNEL NAME,RADIO DATA STREAM URL ADDRESS,ICON IMAGE URL ADDRESS
eg
audiostream.Web,Radios=Radio105,mms://151.1.245.6/1,http://sadjackgroup.files.wordpress.com/2009/02/radio105.jpg
* video channels in podcasts such as YouTube by inserting under the vode
#video feeds the string:
videofeed.Web, Youtube =USER / CHANNEL YOUTUBE PAGE URL ADDRESS
eg
videofeed.Web, Youtube, PS3 = http: //www.youtube.com/ut_rss? type = username & arg = PlayStation
* the audio channels in podcast nserendo under the vode
#audio feeds the string:
audiofeed.Web, PodCasts =USER PAGE / AUDIO CHANNEL URL ADDRESS
Conclusion
At the end of this guide it should be remembered how the project is public and was born for study purposes and using the DLNA data exchange system within a home network.
Any use that does not comply with the rules and laws in force on audio visual material covered by copyright is directly linked to the user.
The program is really well done while being free and developed by a lone programmer.
The PS3 manages in this way to become a complete multimedia player in all its parts.
You can discuss this guide on ours forum where some configuration images are also published.