The ease of finding high-definition material online inevitably leads you to think you can enjoy it on the PlayStation3 console.
Unfortunately, not everything is directly usable. Sometimes it is necessary to resort to format conversion programs to allow SONY's next-gen console to be able to transmit material in high definition (720p and 1080p) to a TV that is LCD or Plasma or, for those who are even more fortunate, to a latest generation FULLHD projector.
Characteristics of an AVCHD
Un AVCHD is a particular Disc format created specifically by SONY for its cameras to handle material in High Definition.
Its features are:
* advanced disc management, the ps3 recognizes the AVCHD and displays a series of commands like a BluRay
* possibility to have subtitles
* viewing the movie set at native resolution (if the movie is 720p, the ps3 will set to 720p, as opposed to single m2ts file management where the file could be upscaled to 1080p)
The most used format on the net for HD files is MKV. There are also WMVs but they are very rare.
Basically an MKV is a format called MATROSKA. This format contains a video track encoded in H264 and one or more audio tracks in various formats (AC3, DTS, etc.), any subtitles in SRT format or other.
The problem arises when you want to bring a movie from MKV format to one compatible with PS3.
Here TSMuxeR intervenes, which, in transforming the MKV movie into a compatible one, intervenes on:
- change of fps (framerate per second)
- Level change, PlayStation 3 only reads material imported at Level 4.1 if in M2TS format, while some MKVs can be at Level 5.1
- insertion of chapters to facilitate the passage of scenes
Using TSMuxeR
TSMuxeR is a freeware program developed by SMLABS.net
This program allows you to manage / manipulate / convert some variables of a video movie from the hybrid format with video in H264 and multi-channel audio to the AVCHD format or to the more practical M2TS format.
First, it is best to get the TSMuxeR program. The latest version is 1.10.6 downloadable at this LINK. The program is very simple to use.
To load a MKV into the program, just click on the ADD button, choose the mkv from your hdd, and click on Open. Once loaded, it will show as in this appropriately modified image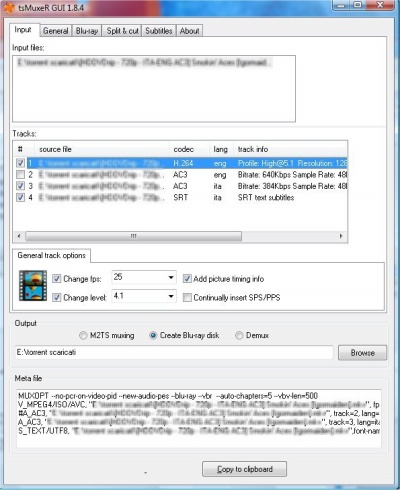
For correct operation it is always important to deselect the Continually Insert SPS / PPS item.
Now there is a small clarification to be made.
TSMuxeR allows you to output the movie in different formats:
- TS: Transport Stream, are the single files of a BluRay
- M2TS: Movie to Transport Stream, is a movie ready to play / view
- BluRayDisc: it is the AVCHD format that allows the use of subtitles and audio multitracks as well as to leave the Level value unchanged.
- Demux: splits the tracks into separate files, the video in .H264 and the audio in its extension, for example .AC3
In particular:
- the TS it is to be used when you want to bring the movie on bluray players other than ps3. Each files must not exceed 1GB.
- the M2TS can be viewed directly on PS3. It cannot exceed 4GB if it is put on external HDD. The PS3 does not allow fast forwarding above 1.5x. It does not handle subtitles, double audio or multitrack audio.
- the BluRayDisc it's a AVCHD, basically a mini BluRay. The PS3 shows the typical BluRay commands on screen, manages subtitles, manages chapter progress, and double audio or multitrack audio. However, it requires you to have the movie at a fixed resolution (1920x1080p or 1280x720p). No other resolutions are allowed, otherwise an annoying green band will appear on the screen.
Generate an M2TS
Once M2TS is chosen as the output format, it is necessary to set the right level, then check the item LEVEL and it sets 4.1.
You choose via the Browse button where you want to save the file in M2TS format.
You deselect irrelevant audio tracks, and leave only the one you want to have selected.
At the end of this preparation phase, it is already necessary to think on which support then to put the M2TS file.
If it goes to a DVD (4.4GB), even DVD-DL (8.1GB) does not change anything else, otherwise you go to the SPLIT window, enable the dot on Split by every size and choose how many GB you need to generate the M2TS file. In this case the program generates the M2TS on several files each of the maximum size decided. This is for those who want to save the M2TS file on an external HDD which must be formatted in FAT3 (Primary Partition) to be seen / recognized by the PlayStation 32.
Generate a BluRayDisc (AVCHD on PS3)
Once BluRayDisc is chosen as the output format, it is important to leave this field unchecked Continually Insert SPS / PPS..
You choose via the Browse button where you want to generate the AVCHD project.
You deselect the irrelevant audio tracks, and leave selected only the ones you want to have, as well as the subtitles. The program sets a chapter in the car every 5 minutes. You can change this setting in the SUBTITLES part.
At the end of this preparation phase, you have to go to the SPLIT window, enable the dot on Split by every size and insert 1 GB so that each M2TS files contained in the STREAM subfolder of the AVCHD project is managed optimally. In this case the program generates the M2TS on several files each of the maximum size decided.
Copy to external USB media
Once we have created our movie we can transfer it to our external USB media which can be one PEN DRIVE or a External hard disk.
In any case it is good to specify that the external support, in order to be read and recognized by the console, must necessarily be of the FAT32 type on Primary Partition.
To copy a BluRay Disc project
we create the directory locally on the PC AVCHD. Inside we copy the two main directories BDMV e CERTIFICATE.
From START -> EXECUTE -> we write "notepad" and we give sending
In here we copy the following code
@echo editing file extensions in progress ...
@ Echo off
rename AVCHDBDMVindex.bdmv INDEX.BDM
rename AVCHDBDMVMovieObject.bdmv MOVIEOBJ.BDM
rename AVCHDBDMVBACKUPindex.bdmv INDEX.BDM
rename AVCHDBDMVBACKUPMovieObject.bdmv MOVIEOBJ.BDM
rename AVCHDBDMVBACKUPCLIPINF * .clpi * .CPI
rename AVCHDBDMVBACKUPPLAYLIST * .mpls * .MPL
rename AVCHDBDMVCLIPINF * .clpi * .CPI
rename AVCHDBDMVPLAYLIST * .mpls * .MPL
rename AVCHDBDMVSTREAM * .m2ts * .MTS
@echo process terminated.
@ Echo off
pause
Now let's save this code with the name of AVCHD.BAT in the directory immediately outside the one called AVCHD.
Once the external media is connected to the console, an AVCHD will be recognized in the car. Just click the X button.
To copy an M2TS movie
For this kind of files you can use the simple copy and paste method. The important thing is that in the console command screen (XMB) when selecting the external media icon, press the Triangle key and then select “View All”.
Burn to DVD
This part requires that the DVD project to be used must be a DVD UDF version equal to or greater than 2.50.
M2TS
- just drop the file into your project and burn.
BluRayDisc
- drag the directories into the project BDMV e CERTIFICATE as well as generated by TSMuxeR.
It makes no difference whether it is 4.4GB DVD (+ R or -R) or 8.1GB DVD-DL (double layer)
Conclusion
The program is not free from bugs. The most annoying is that when using SPLIT, it generates a corrupt file starting from the second part. You have to try again or slightly change the size of the GB, for example if 1GB was previously set, you go to 1.1GB. If it still doesn't work, at 1.2GB. And so on.
Alternatively you can use MKVMergeGui which allows you to split an MKV into several parts. Once the mkv is split, convert each part of mkv as if it were a single movie with TSMuxer and repeat it for each mkv file.
Another bug is due to the fact that the MKV source could have been created without having set the right fps, so it may happen that the final product has theaudio not synchronized with video. In order to correct this problem, proceed as follows:
- check that the fps setting used has generated an audio not synchronized with the video that lasts over time, in practice the gap, or detachment between audio and video is always a certain amount of time (usually a few seconds).
- if yes, then in TSMuxeR, select the audio track and in the delay field enter the correct value in milliseconds (1000 = 1 sec.). A positive value delays the playing of the audio relative to the video. A negative value leads the audio to play ahead of the video.
- if not, then the delay between audio and video increases as the movie passes. It is necessary to change the fps to the opposite value (if it was 25 bring it to 24000/1001, if it was 24000/1001 bring it to 25).
The wait is worth the feat. You can thus enjoy in High Definition all that material that until now could only be seen on PC.
click here to see the enlarged photo.