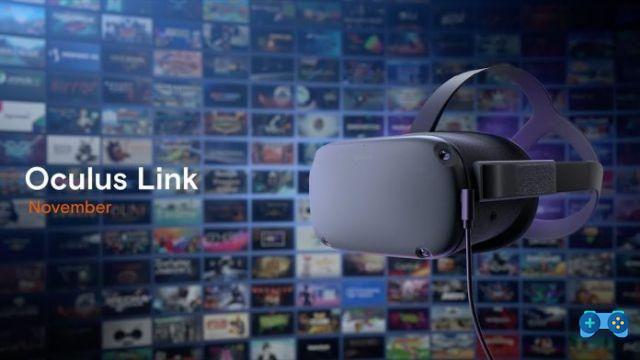
Oculus Link, the function that makes the difference
Announced during the last Oculus Connect 5, Oculus Link is probably one of the most important features introduced by Oculus for one of its headsets, because it allows you to access the games and experiences of the Oculus Rift / S platform using the Oculus Quest headset, and in a certain sense unifying the software offer proposed by Facebook .
With Oculus Link for Oculus Quest it will therefore be possible to use titles specially designed for Oculus Rift S also on Quest but not only, because thanks to Oculus Link it will be possible also access SteamVR and thus further expand the possibilities of Oculus Quest.
The technology is currently in beta but the system has already proved to be stable enough to allow the use of the games in a complete way and, with the next Oculus Connect 7, we expect that the technology can finally be said to be complete for an optimal experience.
How does Oculus Link work?
Oculus Link basically does nothing but offload the burden of game processing onto your PC; the processed data will then be compressed and sent via a USB cable directly to your Oculus Quest viewer, which will then only have the task of decompressing them. In this way it will practically become a kind of tethered headset. This functionality is currently only possible on a stand alone headset such as Oculus Quest, as the signal processed and compressed by the PC must then be decompressed on the target device. Oculus Quest, thanks to his Snapdragon 835 processor is able to carry out this operation in a truly perfect way and already in its first implementations the Oculus Link technology has shown to have excellent potential, with a very low latency it's a really good responsiveness. Furthermore, with each system update, Facebook / Oculus improves the quality of the system and if at the beginning of the beta some drops in frame rate were evident, in the order of 10%, and some artifacts that made the image certainly inferior to the counterpart Rift S, already with the latest version things have definitely improved: the delay has been further reduced and the compression artifacts have almost completely disappeared. Recently then, Surprisingly, Oculus eliminated the need for a particular USB 3.0 cable for the use of the Oculus Link functionality, making it possible to use a USB 2.0 cable such as the supplied charging cable.
Is everything perfect then? Not exactly. Oculus Link in fact, despite the excellent general responsiveness, still provides for image compression and decompression performed downstream; this image processing results in manipulation of the chromatic range of the games which, using Oculus Link appear duller than not only compared to the original version but also compared to the one obtainable used Virtual Desktop, the software that allows you to connect wirelessly to your PC. Compared to the latter, which is also an excellent alternative to play the titles available on SteamVR and Oculus Rift, however Oculus Link allows you to minimize latency and offers better compatibility with games from the Oculus store, such as Stormland , which is not playable using Virtual Desktop.
The choice to also allow the use of USB 2.0 cables, if on the one hand it has suddenly made the search for a cable suitable for the purpose much more accessible, has also somehow extinguished the dreams of those who hoped that the choice of Oculus of impose a USB 3.0 cable for the use of the technology, was aimed at the even more intensive use of the available bandwidth.
In fact, if a USB 2.0 cable is able to guarantee, in optimal conditions, a data transfer of 480Mbps, a USB 3.0 cable even reaches 5Gbps. However, as Carmack explained during the Oculus Connect 6, using Oculus Link is limited to 150Mbps due to the Snapdragon 835's decoding capabilities. This speed is therefore nowhere near saturating the bandwidth available on a USB 2.0 cable and that's why the choice to step back from USB 3.0 to USB 2.0.
But is that really all there is to it? Probably not. As some rumors report, Oculus would be thinking of an "S", or 1.2, version of its Oculus Quest. The new Oculus Quest, in addition to the choice of different construction materials that would make it not only lighter (to date one of the main defects of the viewer) and cheaper to make (the fabric covering, one of the elements that requires more time for the assembly, will likely disappear), will also use a new Snapdragon processor. The main suspect appears to be him Snapdragon 855, a fairly recent processor, but which for the release of the new Oculus Quest, could become much cheaper. The new processor would allow decoding at a much higher speed, making the return to the USB 3.0 cable appropriate.
What do I need to use Oculus Link?
After this introduction to Oculus Link, let's move on to the facts. To start using Oculus Link you will need a few things: your Oculus Quest, a compatible PC, the latest version of the Oculus app, and a cable to connect your Quest to your computer. But let's proceed in order.
Compatible PCs:
In order to use Oculus Link, you must adhere to the following minimum specifications:
- Intel i5-4590 / AMD Ryzen 5 1500X processor or better
- 8 GB memory + RAM
- Windows 10 operating system
- 2.0 USB ports
Currently supported graphics cards include the GTX 1070, GTX 1080, GTX 1080ti, RTX 2070, RTX 2080, RTX 2080, RTX 2080ti, or a comparable Quadro card.
Compatible cables:
Oculus has released its own Oculus Link cable, but the cable has practically sold out in a few minutes and, thanks to the lockdown determined by COVID, the cable is almost never available again on American stores. Indeed, in Spain, the cable has never been marketed and we had to rely on foreign sites or eBay to buy one. Fortunately, Oculus has released some guidelines for cable manufacturers and this has allowed manufacturers to develop "Oculus Link compatible" cables. The recent Oculus Link specification update, introducing the ability to also use USB 2.0 cables, has made it much easier to get a cable suitable for using this feature.
How to activate Oculus Link
- To get started, download and install the Oculus software for PC.
Verify that you have installed the latest version of Oculus PC software this way: Open the Oculus app on your computer. Select Settings on the left of the screen. Click on General from the options available at the top of the screen. Scroll down to the bottom of the section to see the software version. To use Oculus Link, the number must match 1.43 or later. - Update your Oculus Quest firmware if you haven't already.
Turn on your Oculus Quest headset. On the bottom toolbar, select Settings> Show All. Select Information on the left of the settings panel. Next to Version, the number must match 11.00 or later. - Open the Oculus app on your computer.
- Wait for your Oculus Quest to be turned on and connect it to your PC via the USB cable.
- Connect the USB cable to your PC. A message will ask you to allow access to the data. Refuse. If you give your consent by mistake, unplug the USB cable from Quest and plug it back in.
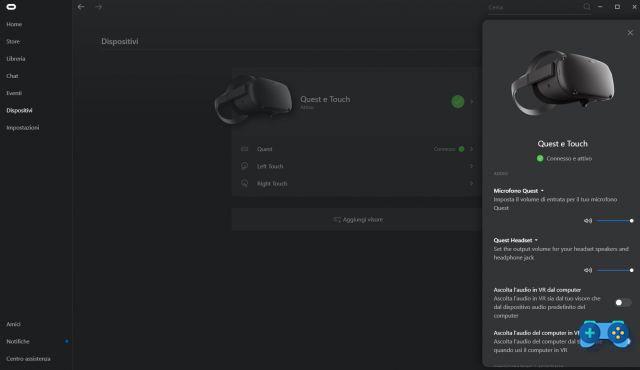
- In the Oculus app, click on Devices from the bar on the left. The Oculus Quest headset image in this menu should now have a green check mark and show "Connected"
- Put on the headset. A message should have appeared "Enable Oculus Link (Beta)", select Enable to start rendering remotely via Oculus Link.
 You are now ready to use your headset with the games on your PC. Good fun!